 WORLDGATE
Manual
From the first start to everyday use, step by step and without prior knowledge. The pictures come from a demo installation; the dates, places and names in it are made up.
Contents
- What is Augenblick!?
- What you need
- Installation
- The first start
- The interface at a glance
- Areas
- Viewing photos
- Searching and filtering
- The map
- Changing the details of a picture
- Rotating pictures
- Editing a picture
- Many pictures at once
- Albums
- Categories
- Memories
- Creating folders and moving pictures
- Sorting by rules
- People and faces
- Finding duplicates
- Deleting and the bin
- Undoing changes
- Uploading photos from the phone
- AI suggestions (optional)
- Users and security
- Backup
- Augenblick! on the phone
- When something does not work
- Small glossary
What is Augenblick!?
Augenblick! is a programme for looking at, sorting and labelling your photos. You use it in the browser – the programme you otherwise use to surf the internet (Safari, Chrome, Firefox, Edge) – on a computer, a tablet and a phone.
The programme itself does not run on your laptop but on a computer in your home that is always on. That is also where the photos are. Your laptop or phone only shows what this computer delivers. Your photos never leave your home in the process.
The three principles
- Your folders stay as they are. Augenblick! does not set up a hidden store of its own. It shows the folders you already have. If you open them later without Augenblick!, everything is still there.
- What you know about a picture is in the picture. When you enter when and where a photo was taken or who is in it, Augenblick! writes that into the image file itself. Other programmes can read it there too. If Augenblick! is ever lost, your details are not.
- Nothing is final. Every change can be undone, and whatever is deleted goes to the bin first.
Note: You cannot break anything in Augenblick! by looking around. Viewing, browsing, searching and filtering never change anything about your photos.
What you need
- A computer that is always running. That can be a NAS (network storage, for example from Synology or running Unraid), a Raspberry Pi or a small home server.
- Docker on this computer. Docker is a programme that starts other programmes ready-packed. Nothing has to be set up piece by piece; the packaging is called a container. Most NAS devices come with Docker.
- Your photos in folders on this computer. What the folders are called and how deeply they are nested does not matter.
- A device with a browser in the same home network, to use Augenblick!.
If words like NAS or Docker mean nothing to you: at the end of this page there is a small glossary. The installation is done once; if you have never done this before, it is best to get help from someone who already runs such a computer. Everything after that is everyday use and needs no specialist knowledge.
Installation
Augenblick! comes as a ready-packed programme (a Docker image) from GitHub: ghcr.io/orohde/augenblick. It runs on ordinary PCs and NAS devices as well as on a Raspberry Pi. The source code is open at github.com/orohde/Augenblick.
- On the computer, create a folder for Augenblick! and in it a file called
compose.ymlwith this content:
services:
  augenblick:
    image: ghcr.io/orohde/augenblick:latest
    restart: unless-stopped
    ports:
      - "8450:8000"
    volumes:
      - ./fotos:/fotos            # your photo folders
      - ./data:/data              # index, previews, accounts
    environment:
      - TZ=Europe/Berlin
- AUGENBLICK_READONLY=false # only with this may Augenblick! write into the photos- At
./fotosenter the folder that holds your photos, and at./dataan empty folder for the data of Augenblick! itself. - Start the programme with
docker compose up -d. - In the browser, open
http://NAME-OF-YOUR-COMPUTER:8450.
Later you fetch a new version with docker compose pull and docker compose up -d. Your photos and settings stay as they are.
The two folders
- Photo folder (
/fotos): This is where your pictures are. Every folder directly beneath it becomes an area. If your pictures have so far been lying loose or in folders per year directly in this folder, create a folder such asFamilyand move everything into it. That is the only thing Augenblick! asks you to do by hand. - Data folder (
/data): This is where Augenblick! keeps its table of contents, the small preview pictures, the user accounts and the journal of changes.
Only view, or change as well?
Without the line AUGENBLICK_READONLY=false, Augenblick! is purely a viewer: it cannot change anything about your photos – neither write details nor rotate, move or delete. That is a good way to start looking around. Only with this line is it allowed to write.
Note: Before you let Augenblick! write, make a backup of your photos. The programme works very carefully, but everyone who wants to keep photos needs a backup – with or without Augenblick!.
The first start
The very first time you open it, Augenblick! shows a set-up page. There you create the first account: a user name and a password of at least 12 characters. This account is the administrator; it sees everything and may change the settings. The set-up page appears only once and only from the home network.
After that Augenblick! scans your photo folders. At the top right you can see how far it has got (“Scanning: 1,200 of 24,000”). The first time, this takes from a few minutes to more than an hour, depending on the amount. You can already browse in the meantime; pictures keep being added.
While scanning, Augenblick! changes nothing about your photos. It checks which files exist, reads the date, the place and the other details from each file and puts a small preview picture into its data folder. Later it checks every 15 minutes whether anything has been added or has disappeared.
The language
Augenblick! is available in German, English, French and Italian. At first it goes by the language of your browser. You can change it under cogwheel → My account → Language; the choice belongs to your account and then applies on every device. Every user can have their own language.
The interface at a glance
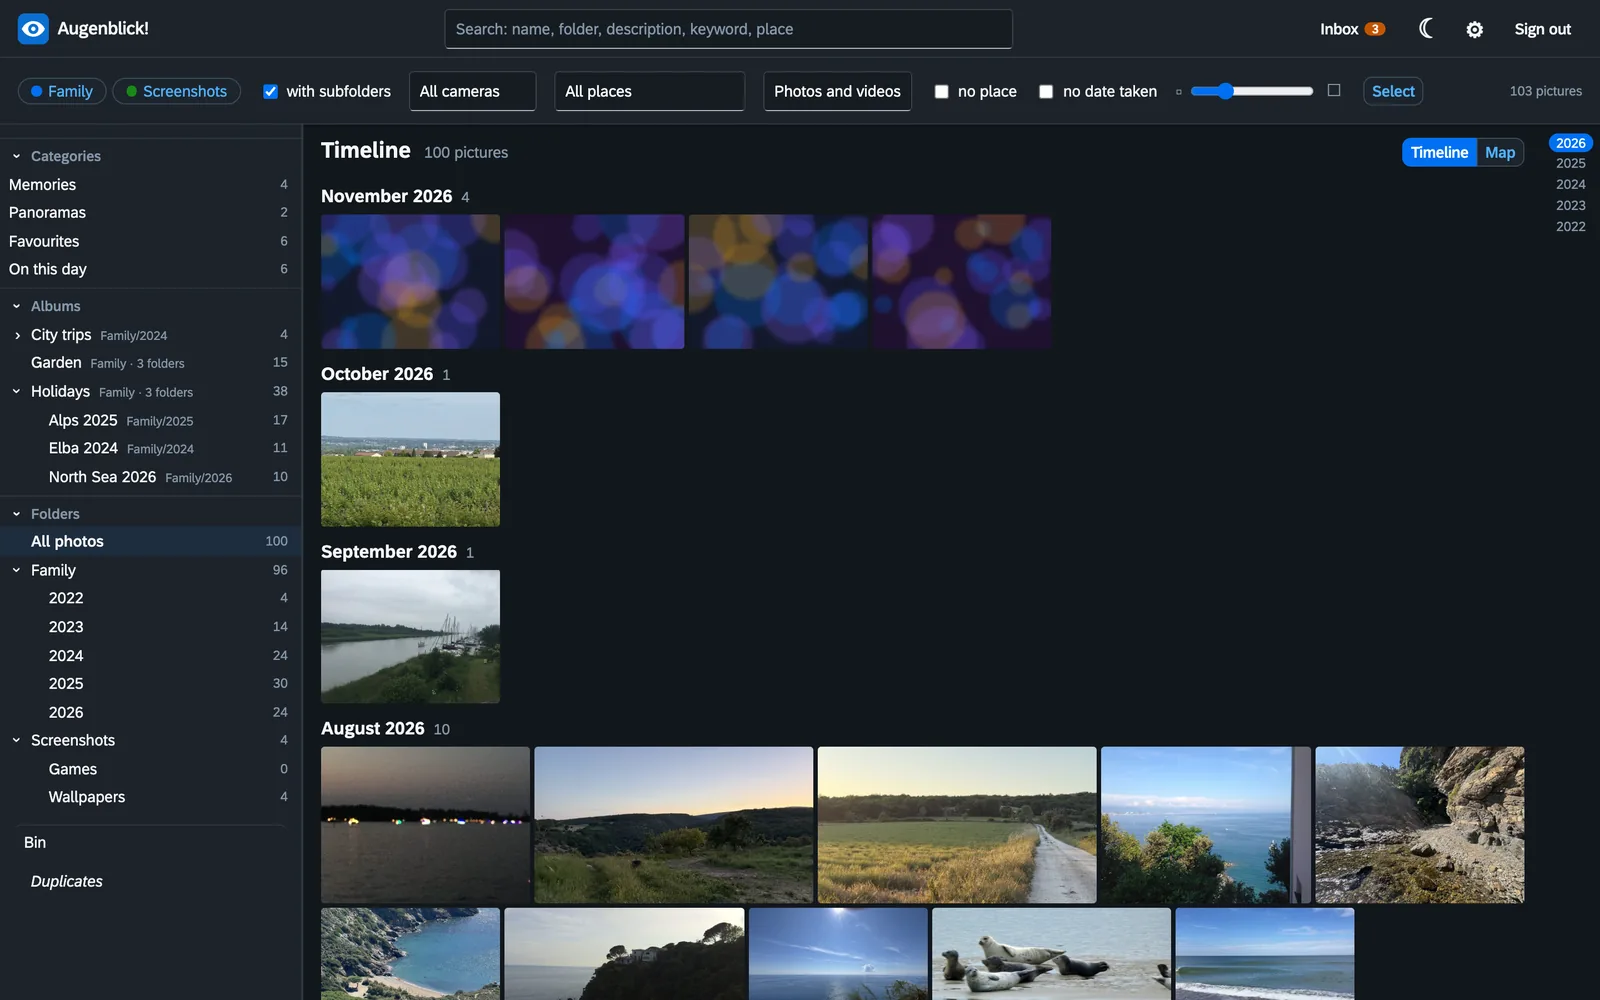
- At the very top are the search field, the Inbox button (it appears as soon as an upload from the phone has been set up, and shows how many new pictures are waiting), the switch for light/dark, the settings (cogwheel) and “Sign out”.
- Below that are the coloured area switches (in the picture: Screenshots and Family). A click hides an area or shows it again. Next to them are the filters.
- On the left is the sidebar with four sections: People, Albums, Categories and Folders. Each section can be folded away with the small arrow. The dividing line to the middle can be dragged with the mouse.
- In the middle are the pictures, ordered by month, the newest at the top. This is the timeline. Every picture keeps its own shape: portrait stays tall, a panorama wide.
- On the right are the years. A click jumps there.
- The slider on the left above the sidebar makes the pictures smaller or larger.
Augenblick! remembers for each user which areas are switched on, how wide the sidebar is and how large the pictures should be in which folder.
Areas
An area is a folder directly beneath your photo folder. Areas separate what does not belong together – and who may see it. Usual areas are:
- Family for the shared photos,
- one area per person for their own things,
- Inbox for new photos from the phone that are still waiting to be sorted in (it is not in the timeline but behind a button of its own – see Uploading photos from the phone),
- Screenshots for pictures that are not photographs.
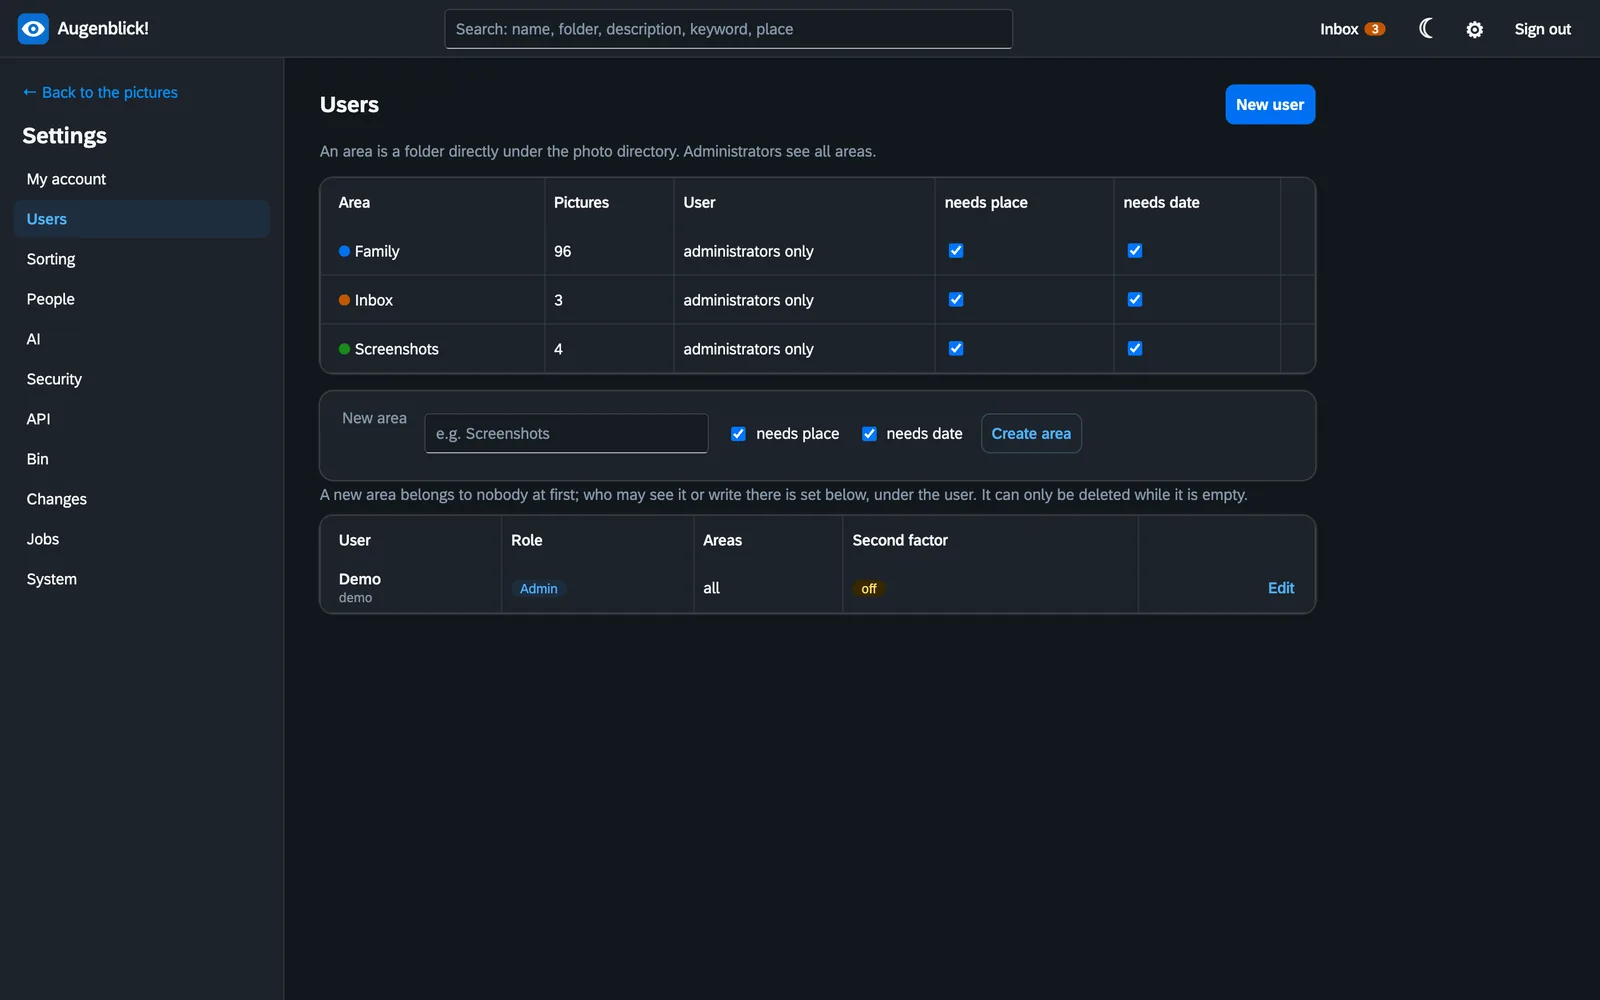
Creating an area
- Click the cogwheel at the top right and then Users on the left.
- Under New area, enter a name, for example Screenshots.
- Click Create area.
The new area belongs to nobody at first; only administrators see it. Who else may see it or change something there is set for each user (see Users and security).
“needs place” and “needs date”
With holiday photos you want to know where and when they were taken. With screenshots or wallpapers that is pointless. If you remove the two ticks for an area, Augenblick! does not look for place names there, and the pictures do not turn up in the lists “no place” and “no date taken”, which are otherwise used to find gaps.
Deleting an area
This only works while the area is empty – its bin too. That way no picture can get lost in the process.
Viewing photos
Timeline and folders
The timeline shows all pictures of the areas that are switched on, by date taken. If you click a folder on the left, you see only its pictures. The tick with subfolders at the top decides whether the pictures from the folders beneath it are included. “All photos” at the very top of the folder tree shows everything again.
Viewing a picture large
A click on a picture opens the single view.
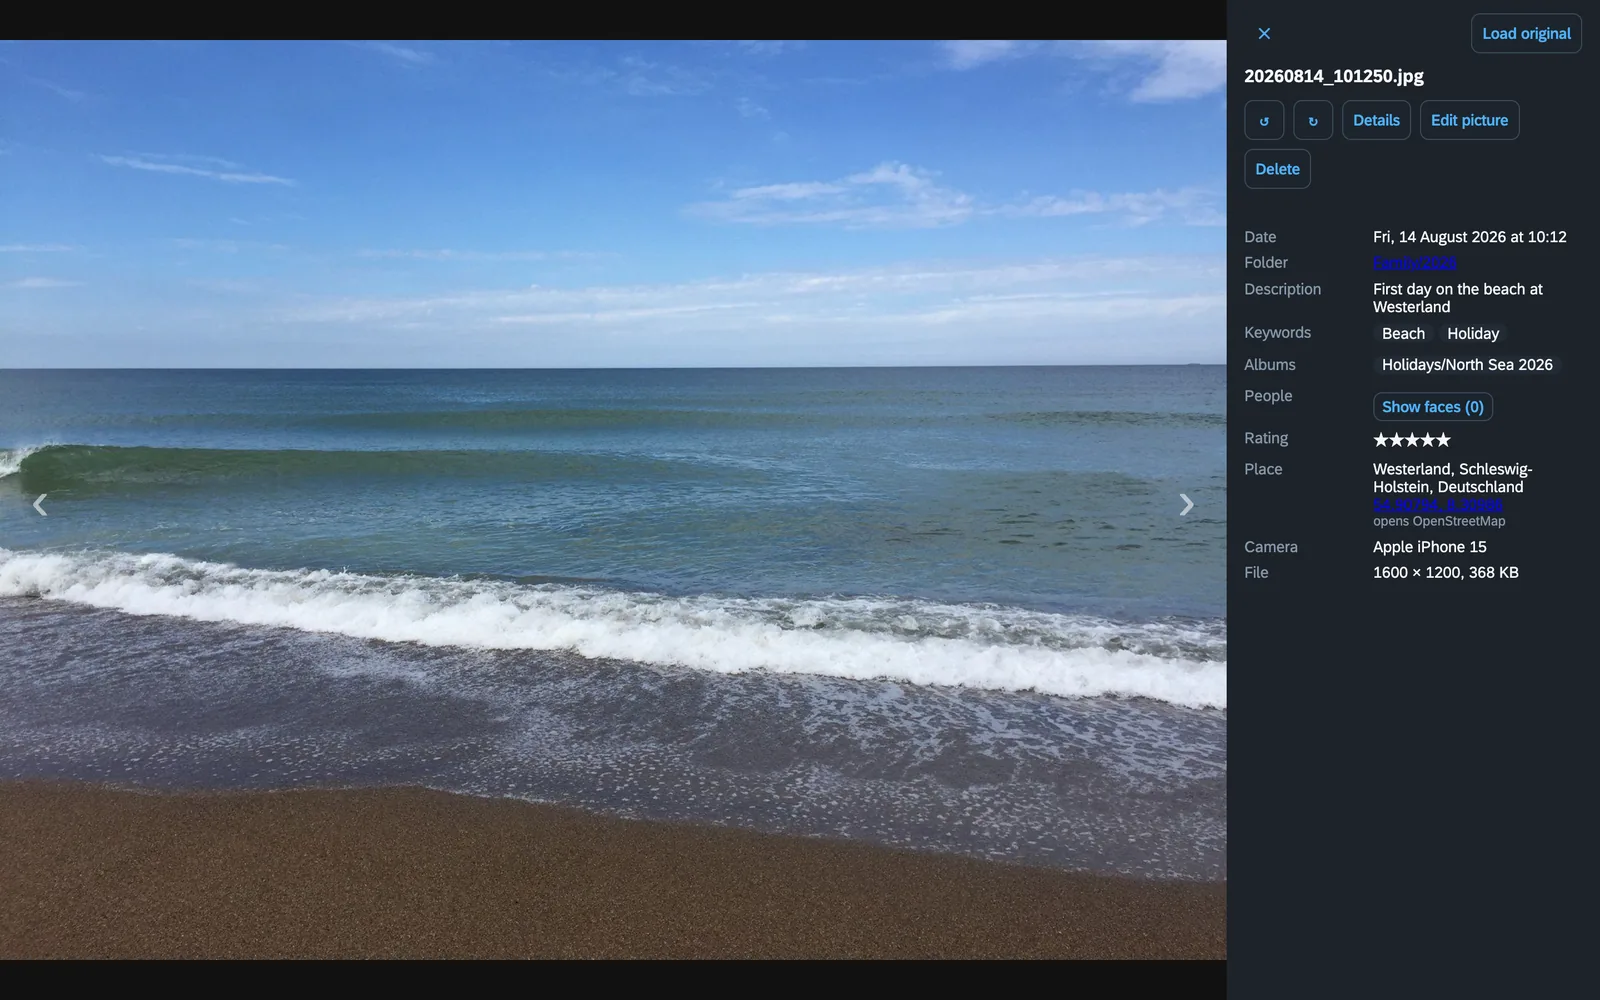
- Browsing: with the arrows on the left and right of the picture or the arrow keys on the keyboard.
- Closing: with the × at the top or the Esc key.
- Load original: fetches the unchanged file onto your device.
- On the right is what Augenblick! knows about the picture: date, folder, description, keywords, albums, people, rating, place, camera and size.
Where the date comes from
Cameras and phones write the date taken into the picture. If it is missing – with scanned paper photos, for instance – Augenblick! takes the date from the file name if there is one in it, and otherwise the date of the file. The single view then says that the date does not come from the picture.
The place by name
Phones store where a photo was taken as a pair of numbers (coordinates). Augenblick! turns that into the nearest town with its state and country, for example “Westerland, Schleswig-Holstein, Deutschland”. The programme brings its list of places with it; nothing goes to the internet for this. A click on the numbers beneath opens the spot at OpenStreetMap.
Films and Live Photos
Films stand among the photos, with a still picture and their length (“▶ 0:42”). You play them in the single view; the date taken, the place and the length are shown there too.
An iPhone records a short film along with a Live Photo. Augenblick! shows only one tile for it: the photo. In the single view the ▶ Live button plays the film. Photo and film belong together as long as both are in the same folder: if you move or delete the photo, the film goes with it, and both come back from the bin together.
Raw files from the phone
Raw files (DNG, for example “ProRAW” from the iPhone) are shown by way of the finished picture that is contained in the file. They can be viewed, moved and deleted, but not labelled or rotated – Augenblick! never writes into a raw file.
Searching and filtering
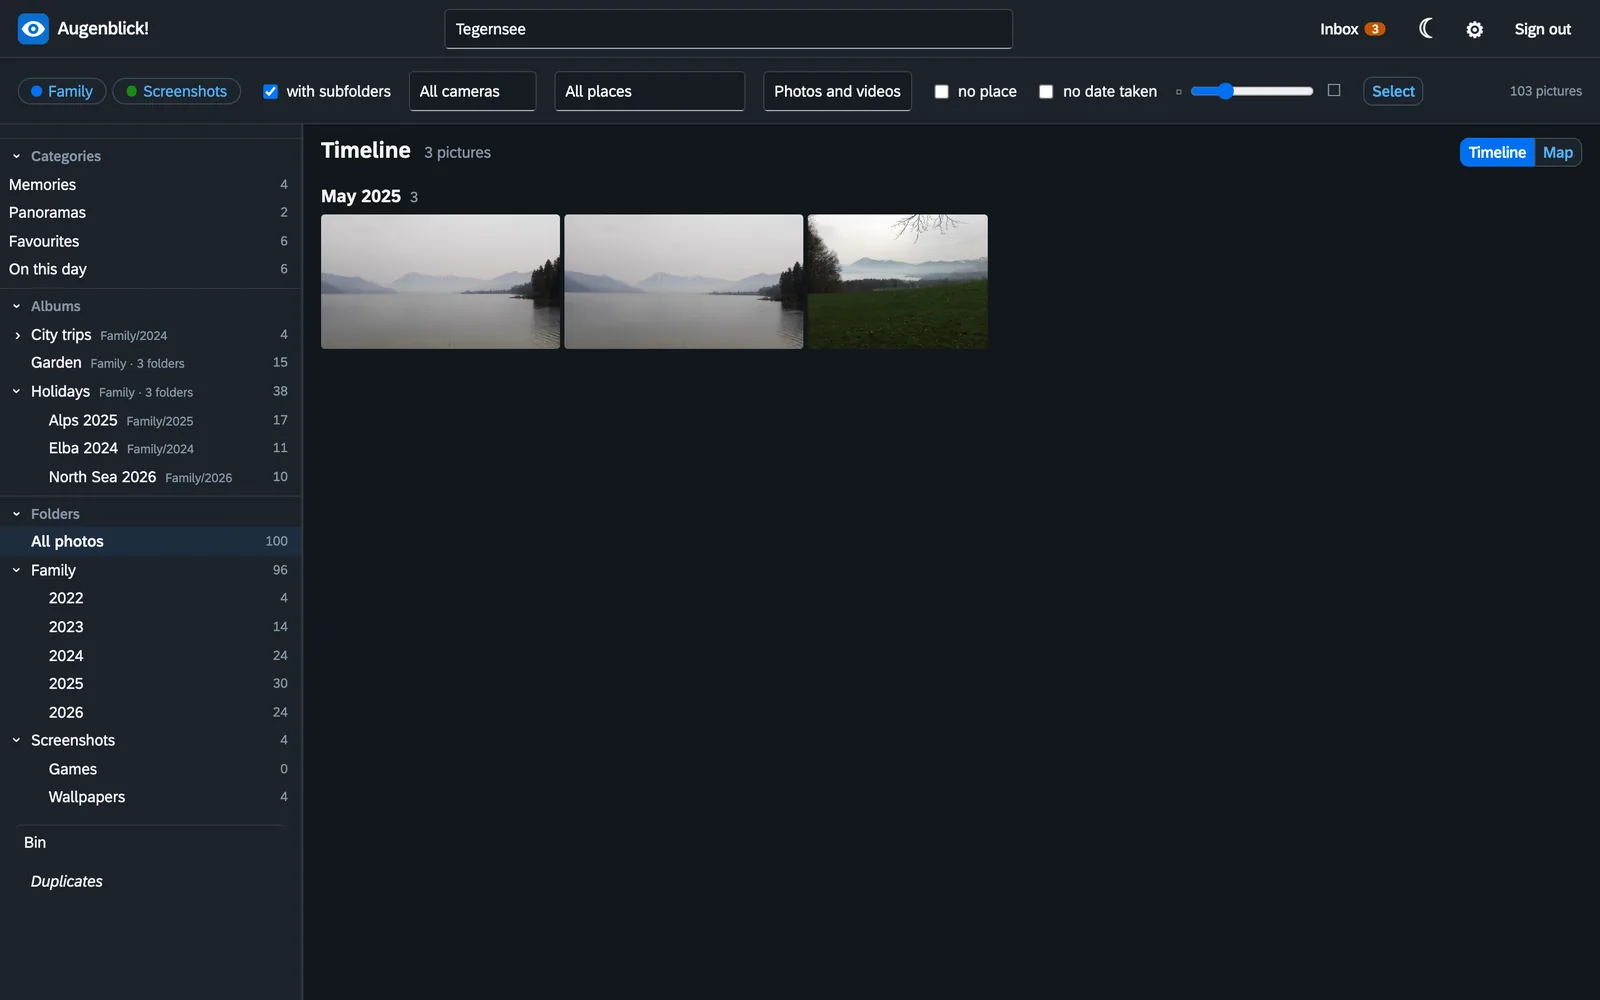
Type what you are looking for into the search field at the top. Augenblick! searches the file name, the folder, the description, the keywords and the place name. Several words must all occur: holiday beach finds only pictures that match both. Empty the field to see everything again.
Next to it are the filters:
- All cameras: only pictures from a particular camera or phone.
- All places: only pictures from one country or one town. The list shows only what occurs in your pictures.
- Photos and videos: only the one or the other.
- no place: pictures that do not know where they were taken.
- no date taken: pictures whose date does not come from the camera.
- doesn't fit the pattern: pictures that are not where your sorting rules want them. The filter only exists once you have created rules.
Search, filters, area switches and the chosen folder work together. If you see unexpectedly few pictures, a filter is usually still set.
The map
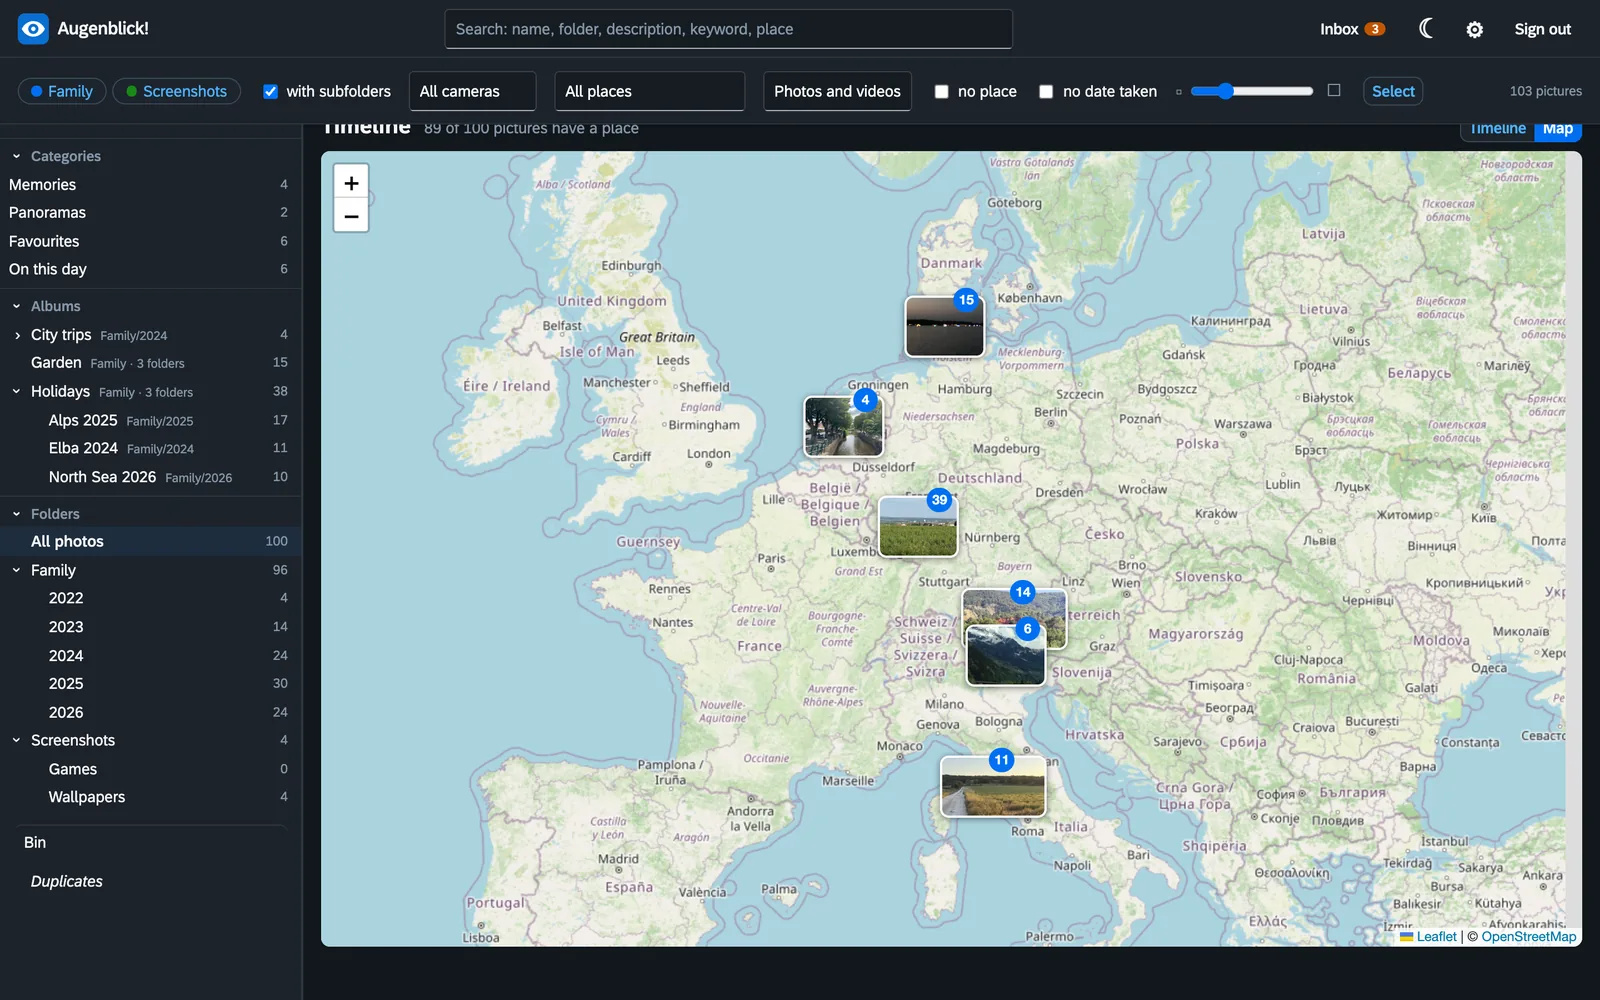
Above the pictures on the right is the switch Timeline | Map. The map shows all pictures of the current selection that have a place. The number on a picture says how many pictures are bundled there. A click zooms in; if the pictures are at the same spot, a small overview opens, and a single picture opens the single view.
The map images come from OpenStreetMap. Your browser asks there as soon as you open the map. All that is transmitted is which section of the map you are looking at – no pictures and no picture names.
Changing the details of a picture
Open a picture and click Details on the right.
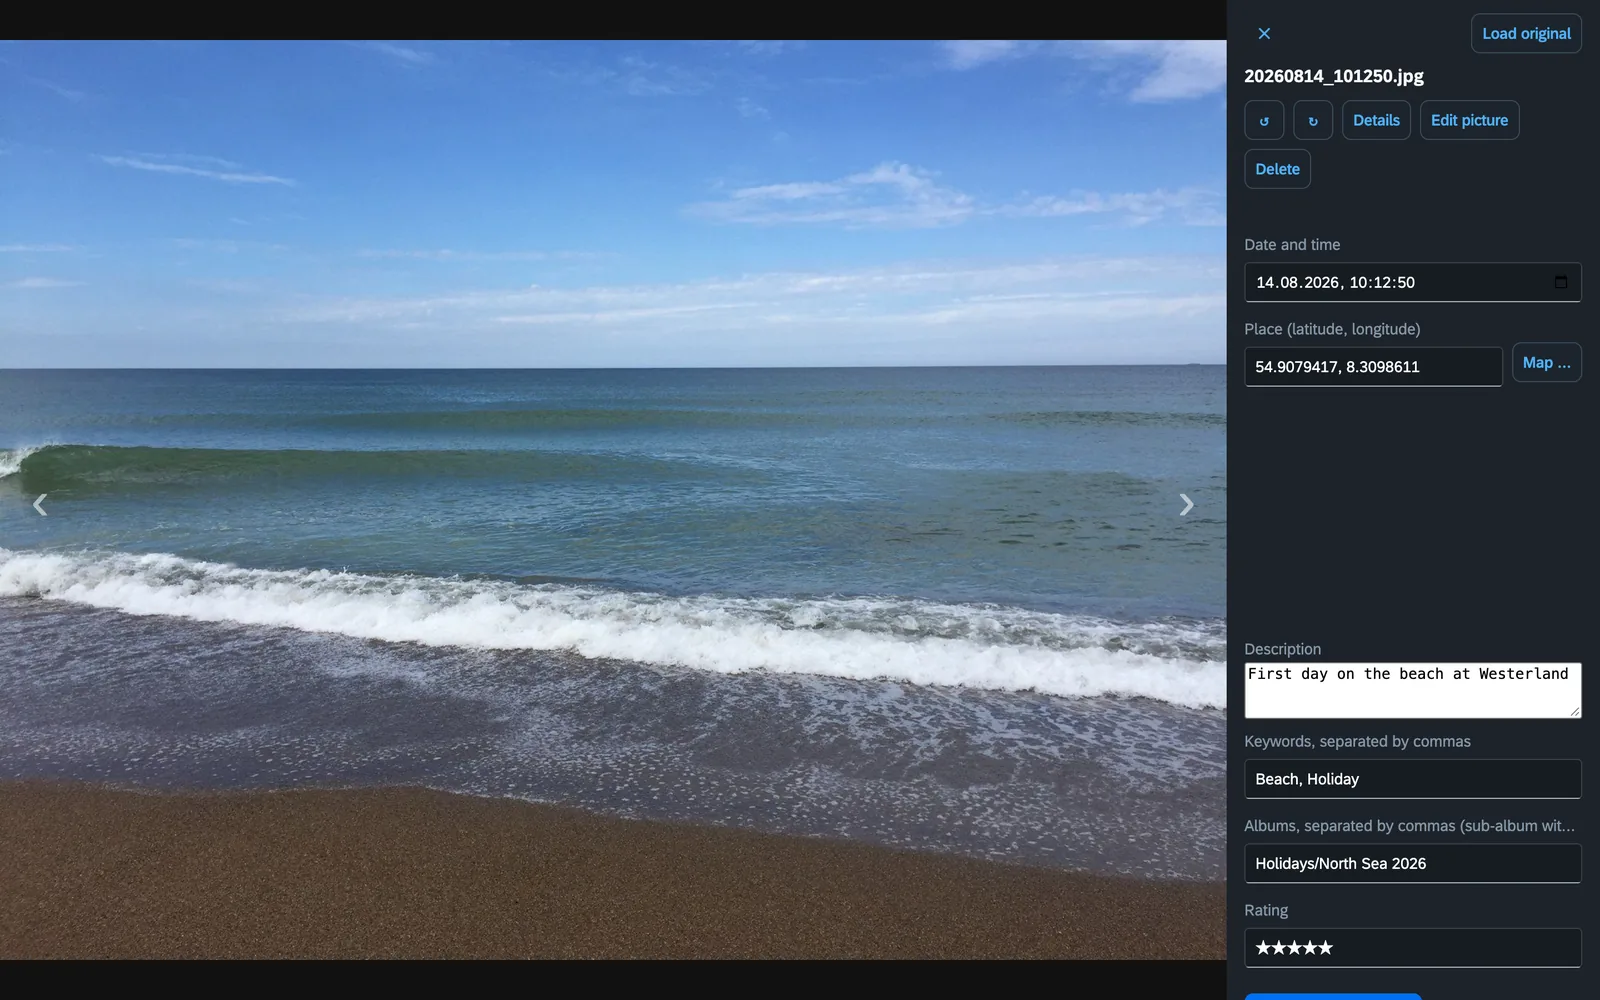
- Date and time: when the picture was taken.
- Place: two numbers (latitude, longitude). You do not need to know them: the Map … button opens a map. Search for a place at the top (“Bad Kreuznach”) or click on the map; the pin can be dragged. “Apply” enters the numbers.
- Description: a sentence of your own.
- Keywords: single words, separated by commas, that you want to search for later – beach, holiday.
- Albums: which albums the picture should be in, separated by commas. You write a sub-album with a slash: Holidays/North Sea 2026.
- Rating: zero to five stars.
Only the Write into the picture button saves. “Cancel” discards what you have typed.
What “write into the picture” means
Augenblick! does not keep your details somewhere on the side but writes them into the image file. This is how it goes about it:
- It creates a new file with the changed details next to the photo.
- It checks whether the actual picture in it is the same, point for point, and whether the details are in there as wanted.
- Only then does the new file replace the photo.
If something goes wrong during the check, your photo stays as it was, and Augenblick! tells you. The picture itself – that is, what you see – is never altered or saved afresh when details are changed.
Note: So far videos can be viewed, moved and deleted, but not yet labelled.
Rotating pictures
If a picture is lying on its side, you rotate it in the single view with the two round arrows ↺ and ↻ above the details.
JPEG pictures (the usual format of cameras and phones) are rotated without loss of quality: the picture is not recalculated, only rearranged. To be safe, the programme rotates the result back as a test and compares it with the original.
In a few cases this cannot be done without loss, for example when the picture size does not fit the grid of the format. Then Augenblick! leaves the picture untouched and only sets a flag saying “this picture is to be shown rotated”. The single view tells you so.
HEIC pictures (the space-saving format of newer iPhones) are rotated by way of the orientation field that this format provides for the purpose; here too the image data stays untouched. Other formats, such as PNG or raw files, cannot be rotated so far.
If faces are marked in the picture, the frames rotate with it.
Editing a picture
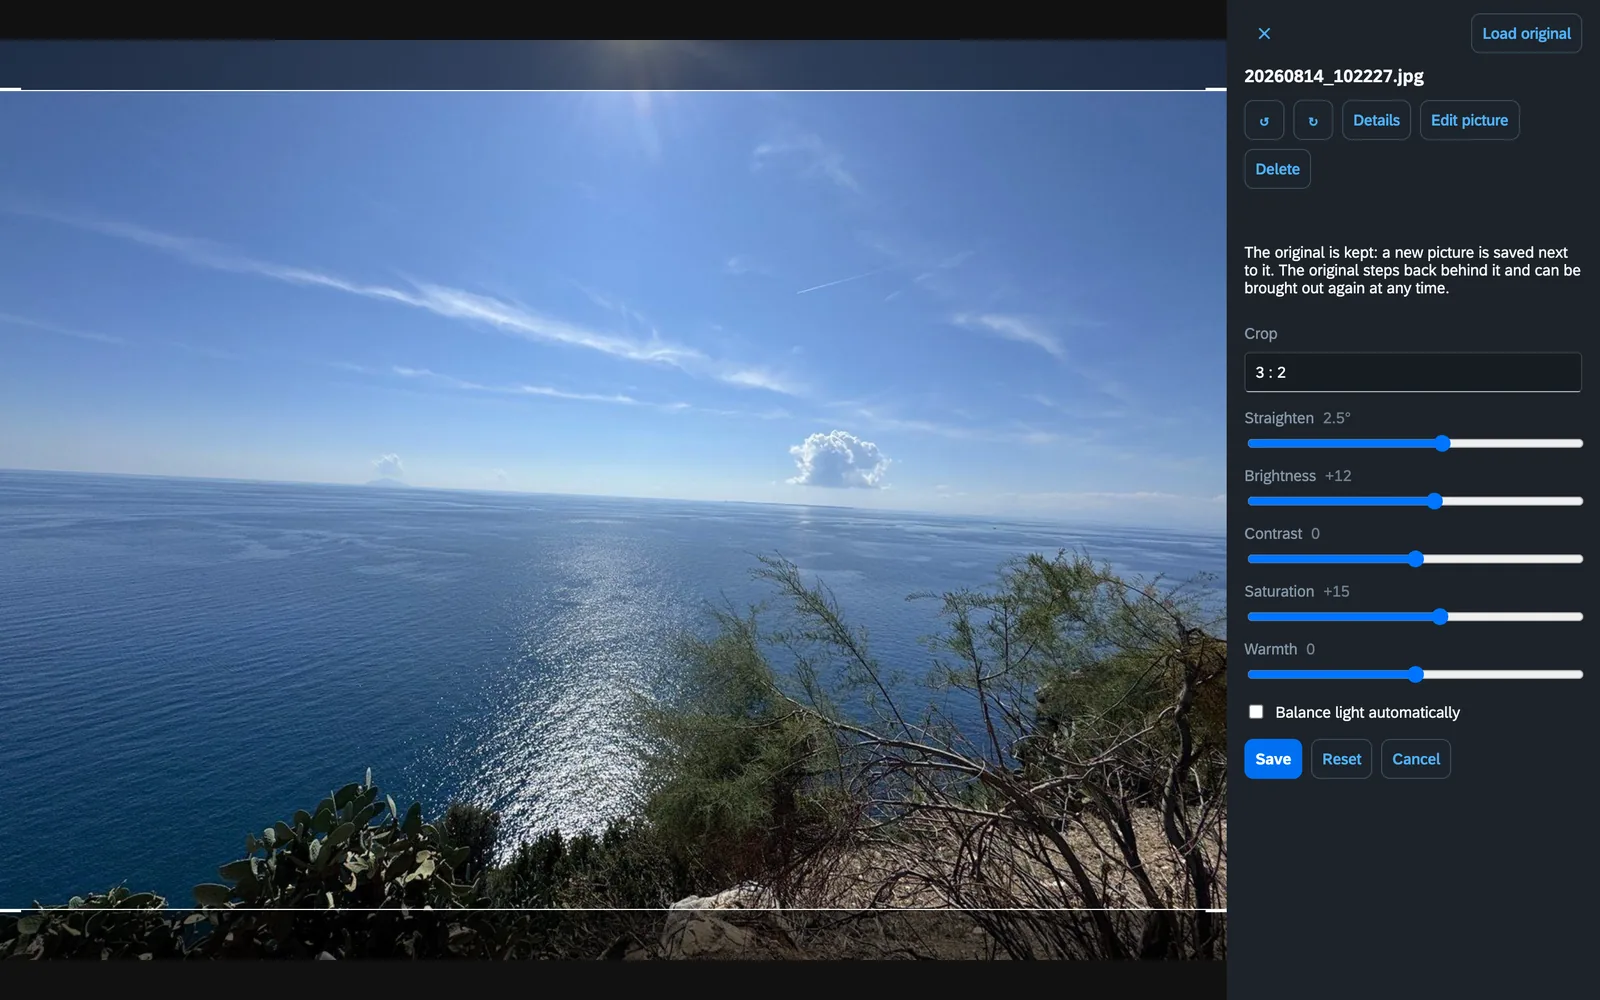
A horizon held crooked, too dark, too much around the edges: open the picture and click Edit picture on the right.
- Crop: There is a frame in the picture. Drag its corners and edges or move it as a whole. With the list above it you set a fixed aspect ratio: as the original, 1 : 1, 4 : 3, 3 : 2 or 16 : 9.
- Straighten: The slider turns the picture by up to 15 degrees to the left or right. The corners that would become empty are cut away by Augenblick! itself.
- Brightness, Contrast, Saturation, Warmth: four sliders; in the middle everything stays as it is.
- Balance light automatically: a tick for flat-looking pictures.
Whatever you set, you see in the picture straight away. Save calculates the result, Reset puts all sliders back to the start, Cancel discards.
The original stays
Augenblick! does not overwrite your photo in the process. It saves the edited version as a new picture and renames the original: IMG_4711.jpg becomes IMG_4711_original.jpg, and the new version carries the old name. In the timeline you now see only the edited version; the original steps back behind it.
- For an edited picture the single view says what was changed, and View original shows you the picture you started from.
- Continue editing picture opens the sliders again, with the values from last time. The calculation always starts afresh from the original; so editing several times costs no quality.
- Discard the edit – back to the original moves the edited version to the bin and gives the original its name back.
- Date, place, description, keywords, albums and names are in the new version too. Face frames move along with the crop.
- If you move or delete the picture, the original goes with it.
Note: Photos can be edited, not films and not raw files. The edited version is always a JPEG.
Many pictures at once
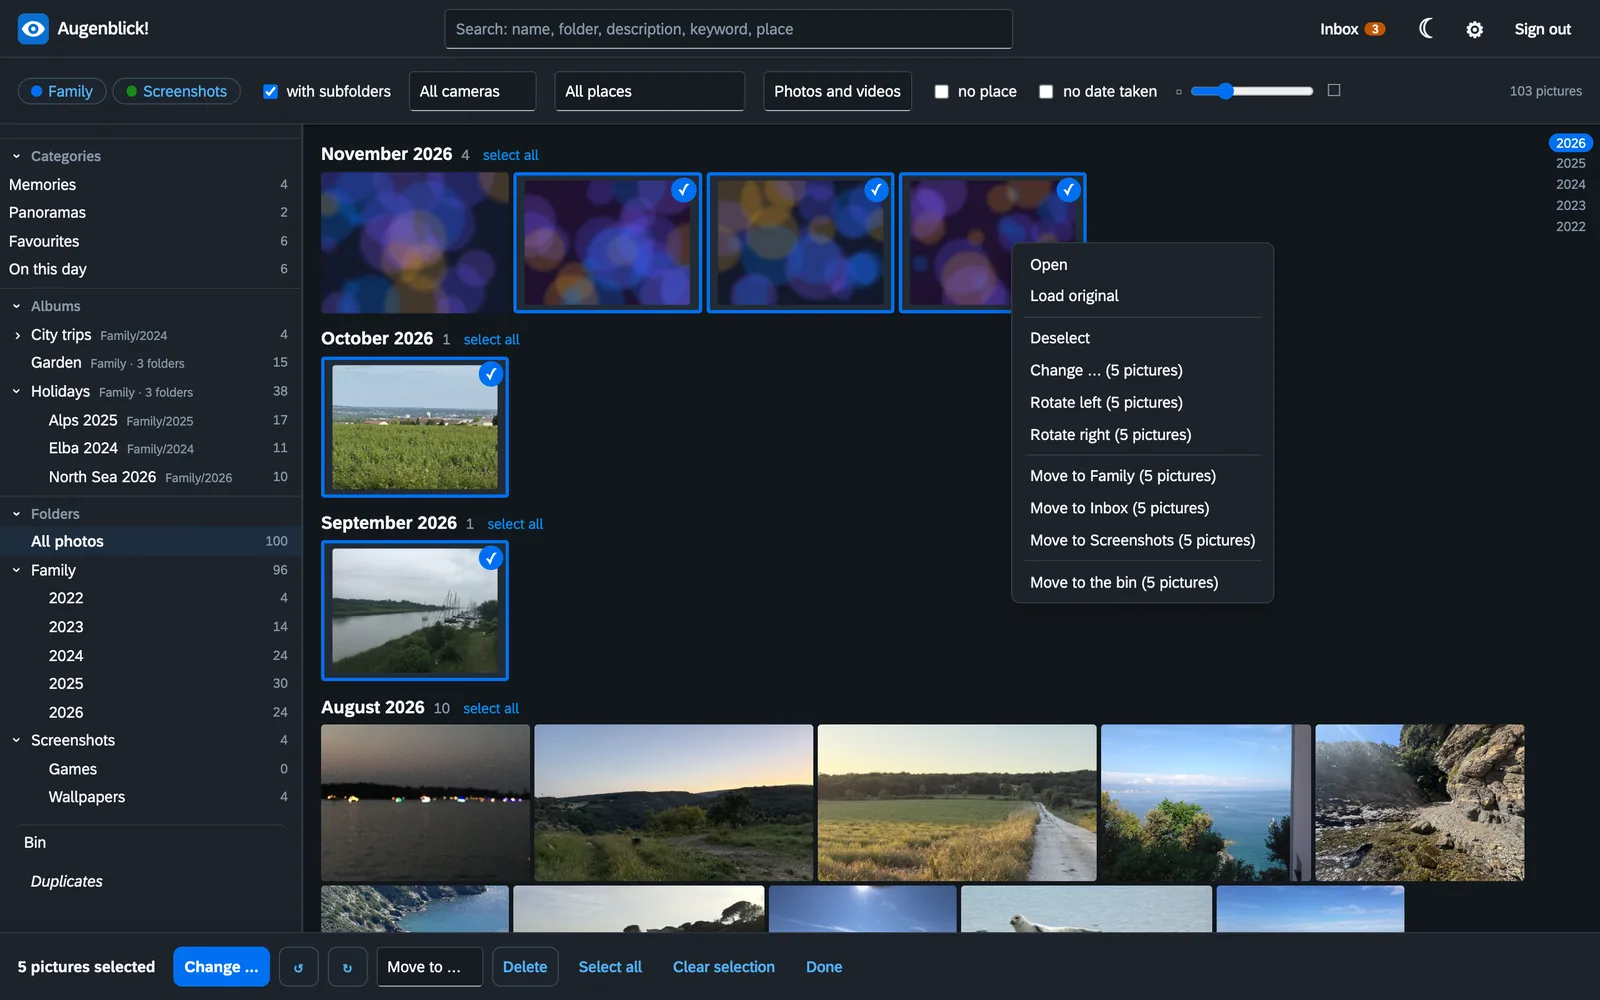
- Click Select above the pictures.
- Click the pictures you mean. They get a blue frame and a tick. A second click takes a picture out again.
- A bar appears at the bottom with what you can do with the selection.
Selecting faster
- A whole row: click the first picture, then the last one while holding down the Shift key (⇧).
- A whole month: “select all” next to the name of the month.
- Everything that is currently shown: “Select all” at the bottom in the bar – across all months.
What the bar offers
- Change … opens a form for all selected pictures: shift the date (for example “2 hours later” when the camera clock was wrong) or set it for all, set or remove the place, add or remove keywords and albums, set the rating. Fields you leave empty stay in the pictures as they are.
- ↺ ↻ rotates all selected pictures.
- Sort in puts the pictures where your rules want them.
- Move to … moves them to another area.
- Delete moves them to the bin.
- Done ends selecting.
The right mouse button
Everywhere in Augenblick! a right-click opens a small menu with what is possible at that spot: on a picture, a folder, an album, a person, a face, in the bin. If you do not know how something is done, the right-click is usually the shortest way. A right-click on a picture that is not selected selects exactly that one; if it is part of a selection, the menu applies to all selected pictures.
Albums
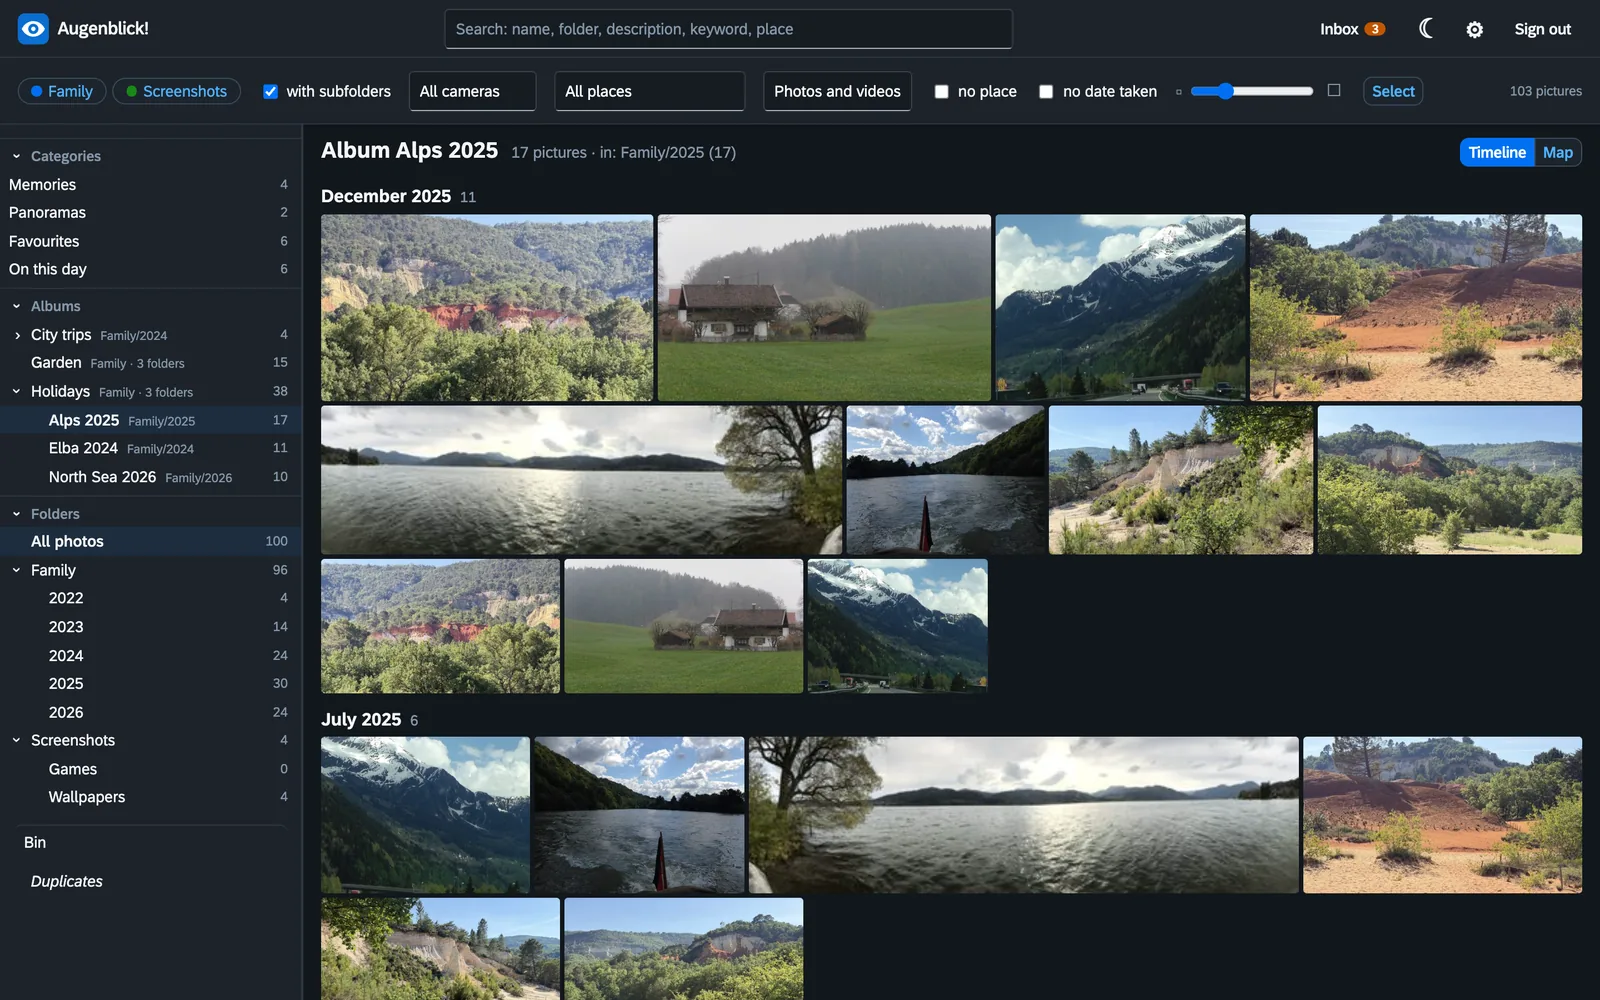
An album is a collection of pictures on one subject: “Holidays/North Sea 2026”, “Garden”, “Grandma's 80th birthday”.
What matters is the difference from a folder: a folder is a place, an album is a mark. Every picture is in exactly one folder. It can be in as many albums as you like without being copied. The mark is in the picture itself; if you move the picture to another folder, it stays in its albums.
- Putting a picture into an album: open the picture's details and enter the name under “Albums”. If the album does not exist yet, this creates it.
- Many pictures: select them, “Change …”, enter the name under Albums → add.
- Taking a picture out of an album: the same way, under Albums → remove.
- Sub-albums are written with a slash: Holidays/North Sea 2026 then stands under “Holidays” in the album tree.
- Remembering a folder as an album: right-click the folder → “Remember folder as album …”. Handy before re-sorting folders by subject into folders per year: the subject is kept as an album.
After every album it says in small type where its pictures are. An album disappears by itself when no picture carries the mark any more.
Categories
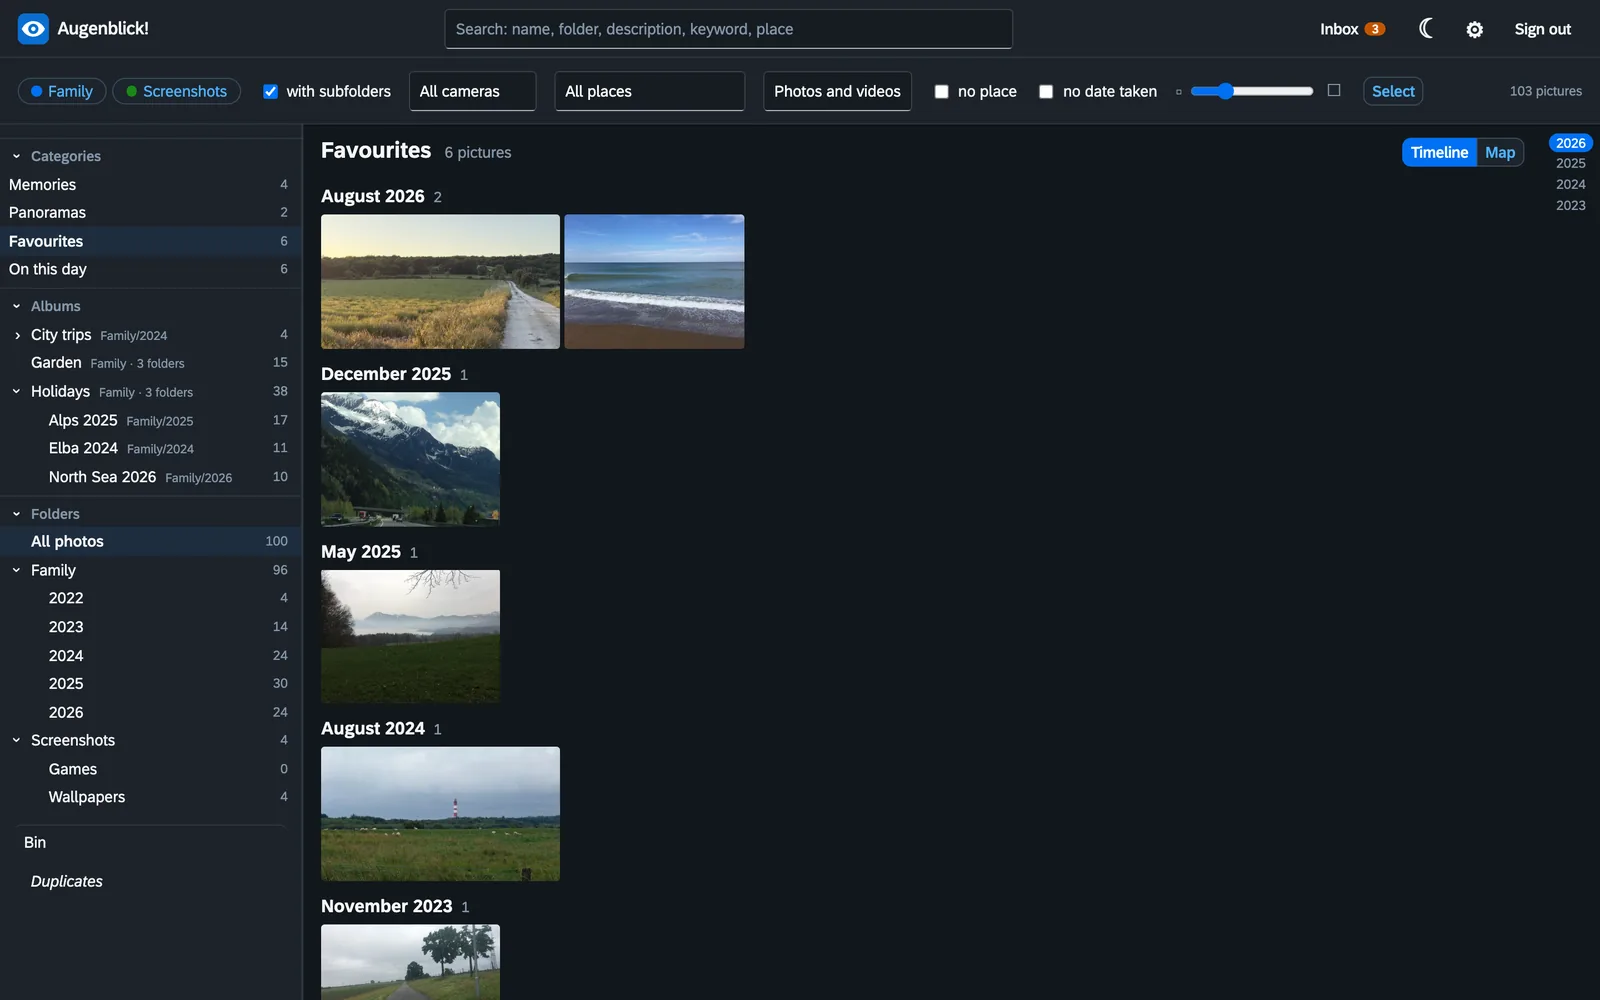
Under Categories in the sidebar are collections that fill themselves. You do not have to do anything for them, and nothing is written into your pictures for them.
- Memories: journeys and look backs – see the next section.
- Videos: all films.
- Live Photos: photos with their short film.
- Panoramas: shots that are at least twice as wide as they are high (or the other way round).
- Favourites: pictures you have given four or five stars.
- RAW: raw files.
- On this day: what was taken on today's date in earlier years.
A category only appears if there are pictures for it. Area switches, search and filters work here too.
Memories
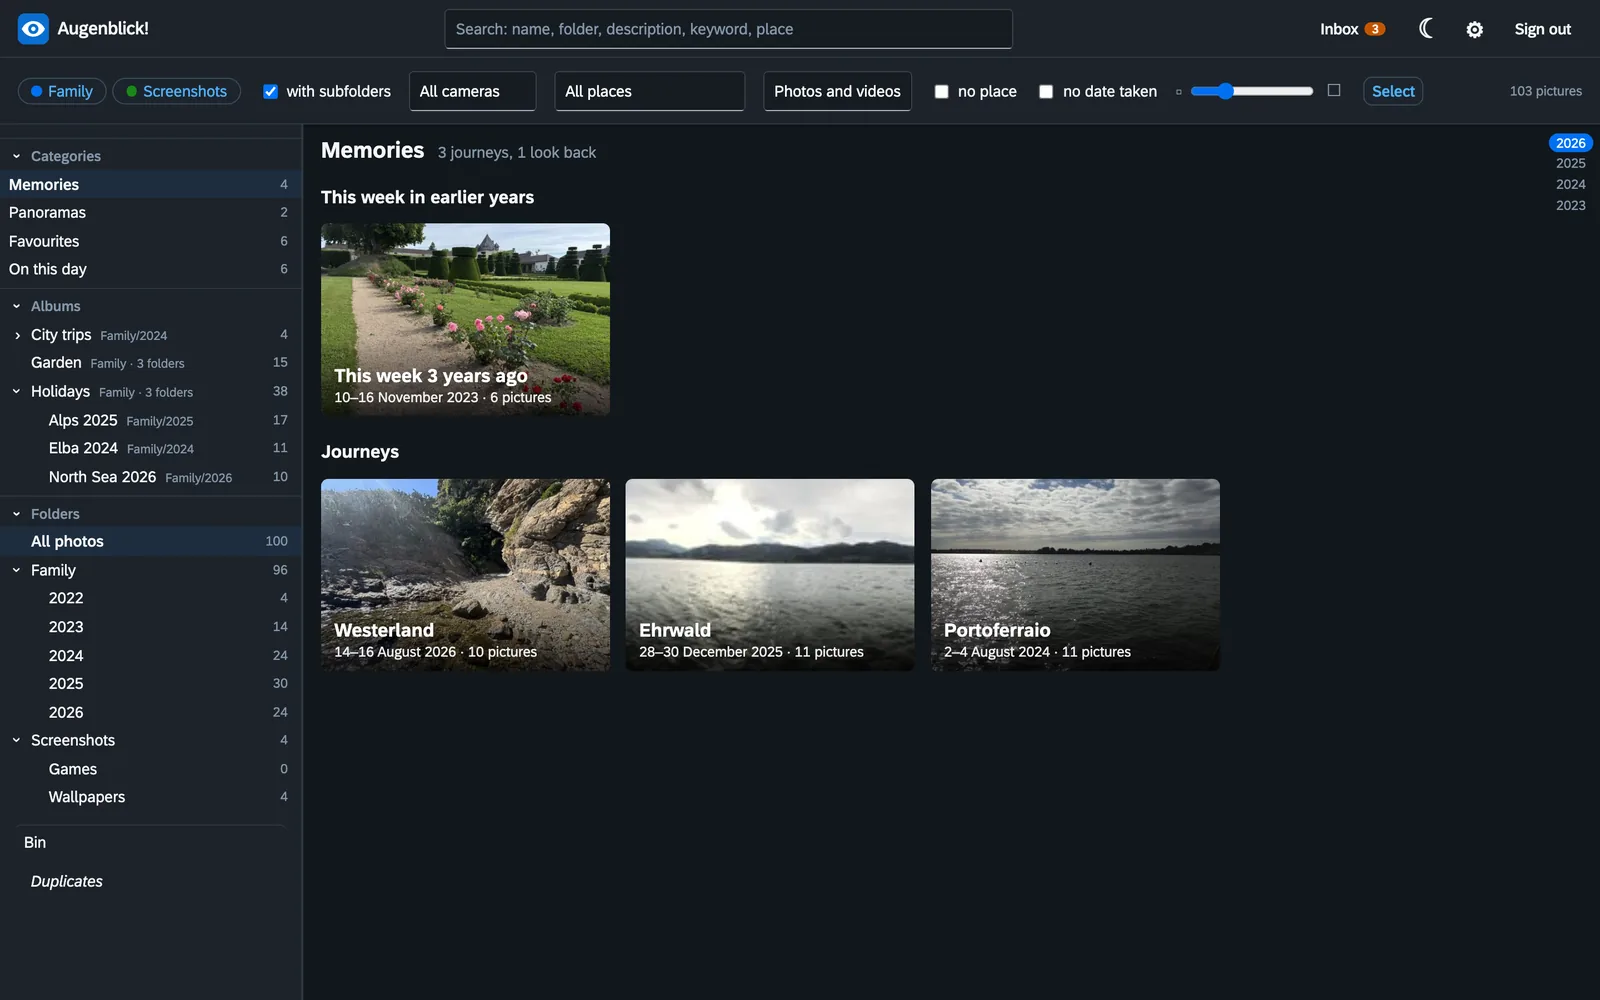
Augenblick! finds by itself what belongs together in your pictures and shows it as cards under Categories → Memories:
- Journeys: several days in a row on which you took photos far away from home. Where “home” is, Augenblick! works out from the pictures themselves: it is the place where pictures were taken on the most days in a year. A journey is named after the town you were in (“Westerland”), if need be after two of them or after the country.
- This week in earlier years: what was taken around today's date one, two, ten years ago.
A click on a card opens the memory. First you see a selection of up to twelve pictures that stand for the whole: spread across the days, preferably pictures with stars and with people, no series of almost identical shots. Show all … pictures opens the whole period, Show only the selection leads back.
Nothing is stored for memories and nothing is written into your pictures. They are made afresh every time from date and place; if a picture is added or you change a date, they are right again by themselves. That is why journeys need pictures that know their place.
A title from the AI (optional)
If the AI has been set up and the switch “AI may name memories” is on (cogwheel → AI), every memory has the button AI: suggest title. The AI then gets up to eight reduced pictures of the selection and suggests a title, a sentence and the cover picture. This happens only at your click, for this one memory, and can be discarded again.
Creating folders and moving pictures
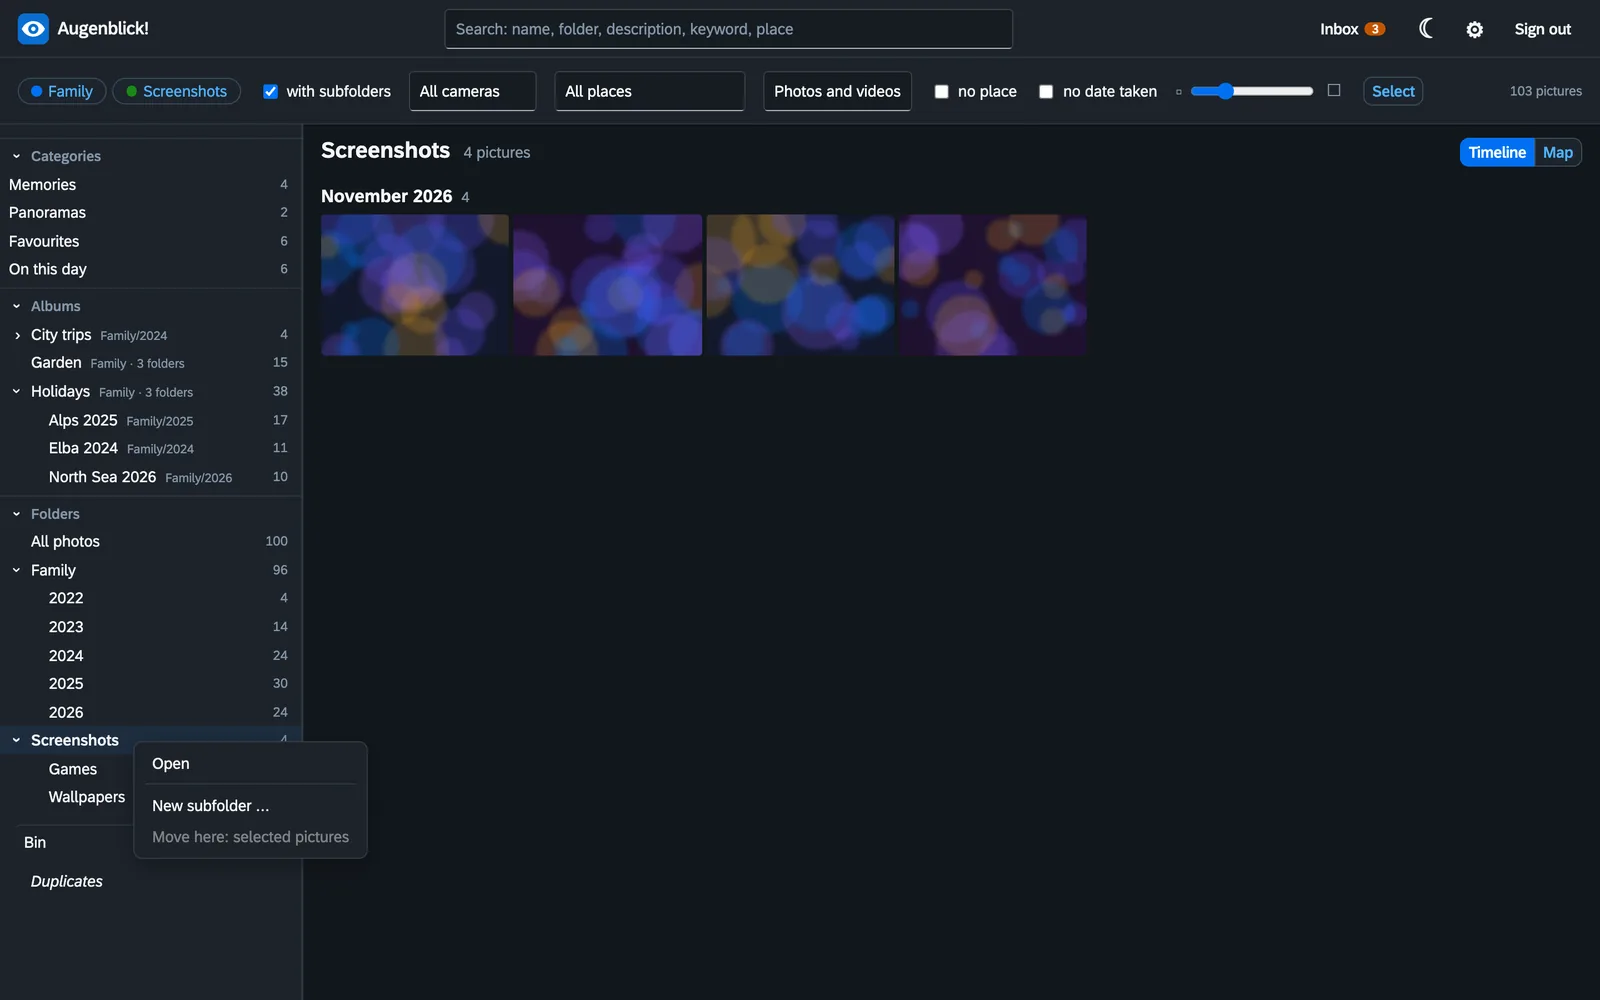
Creating a subfolder
- In the folder tree on the left, click with the right mouse button on the area or folder in which the new folder is to be created.
- Choose New subfolder … and give it a name.
The folder appears in the tree straight away, even while it is still empty.
Moving pictures into a folder
Select the pictures (see above). Then there are three ways:
- Dragging: drag the selected pictures onto a folder in the tree with the mouse button held down, and let go.
- Right-click on the folder: “Move here: … selected pictures”.
- Bar at the bottom: “Move to …” for a whole area.
Augenblick! asks before moving. If a file of the same name is already at the destination, the moved picture gets a number added; nothing is ever overwritten. If a folder is left empty in the process, Augenblick! clears it away.
To move pictures you need write permission in the old and in the new area.
Deleting an empty folder
Right-click the folder → “Delete empty folder”. Folders with pictures cannot be deleted this way.
Sorting by rules
If you like, you can leave the filing to Augenblick!. A rule says for an area or folder what the subfolders and file names should look like. The usual rule: one folder per year, the file name made from date and time – IMG_4711.jpg becomes 2026/20260814_101250.jpg.
- Cogwheel → Sorting.
- Enter the area or folder the rule applies to.
- Choose a template, for example “Year, file named by date” (the building blocks it fills in, such as
{Jahr}, are German words – Jahr means year). - Save.
A rule does not move anything yet. It only says where a picture belongs. Pictures that are somewhere else can be found with the filter doesn't fit the pattern; the preview in the settings shows what would happen. Nothing is moved until you press “Sort in” – for one picture, a selection or everything.
- Only pictures that have their date from the camera are sorted. A picture with an estimated date stays where it is.
- For each area you decide whether, after a date change, Augenblick! asks or sorts in by itself.
- For individual folders you can create an exception (“Touch nothing”).
- If you move pictures into an area with a rule, they land in the right place straight away.
People and faces
Augenblick! can find faces in your pictures and group similar faces together. You say who it is, and the name is written into the picture. After that you find all pictures of a person with one click.
This happens entirely on your own computer. No picture and no face goes to the internet for it.
Switching it on
Cogwheel → People, then tick the areas that are to be searched. The search runs slowly in the background, only reads, and after a restart carries on where it left off. With tens of thousands of pictures it takes a few hours.
Naming faces
- On the left under “People”, click Unnamed faces.
- On the left there is a list of groups of similar faces. Click one.
- In the middle you see the faces of the group. If you move the mouse over one, the right-hand column shows the whole picture with the face marked.
- Click the faces that do not belong; they turn light and are left out. With “All”, “None” and “Invert” this goes faster.
- Enter the name and click Write into the pictures.
If Augenblick! already knows a person, it suggests their name for new faces (“looks like Grandma”). That is only a suggestion: nothing is written until you click.
Further groups in the list
- perhaps <name>: single faces that resemble a person you have already named. The most likely come first. Click the ones that really are – it is only a guess.
- Single faces: the rest – faces that fit no group and no name.
- Twice in the picture: pictures in which the same name is on two faces. One of them is someone else. Click the wrong one and take the name away from it.
- Already named in copies: faces in a second copy of a photo whose first copy already carries the name.
- Not a face, says the AI: only if the AI has been set up. The button “AI: find false hits” has it look through the unnamed crops; whatever it does not consider a face (a wheel, a pattern) is listed here afterwards, and you decide. It is never asked who someone is.
- Ignored: faces you do not want to name – strangers in the background, statues, posters. “Ignore” changes nothing in the picture; the faces are just no longer suggested and can be brought back from here.
In the individual picture
In the single view, Show faces shows the frames in the picture. There you can change or remove a name and draw a frame by hand around a face the search did not find.
Renaming a person or merging two: right-click the person in the sidebar → “Rename or merge …”.
Finding duplicates
Over the years pictures pile up twice: the same file in two folders, or the same picture once in full size and once in a reduced version. The Duplicates page (link at the bottom of the sidebar) finds both.
- Click Search now. This only reads and takes a while with many pictures.
- Each row shows a picture that exists more than once, with the size, date and details of each version.
- The suggestion is to keep the largest version. You can choose another.
- The button moves the other versions to the bin.
- The tick First carry over … makes sure that albums, keywords, names, description, rating and place from the versions that go are written into the one that stays. That way no knowledge is lost.
- Not duplicates separates a group for good – two shots from the same spot, say, that only look alike.
- Pictures of the same size with small differences are never taken for copies by Augenblick! on its own. They can be two shots, in one of which someone is blinking.
Deleting and the bin
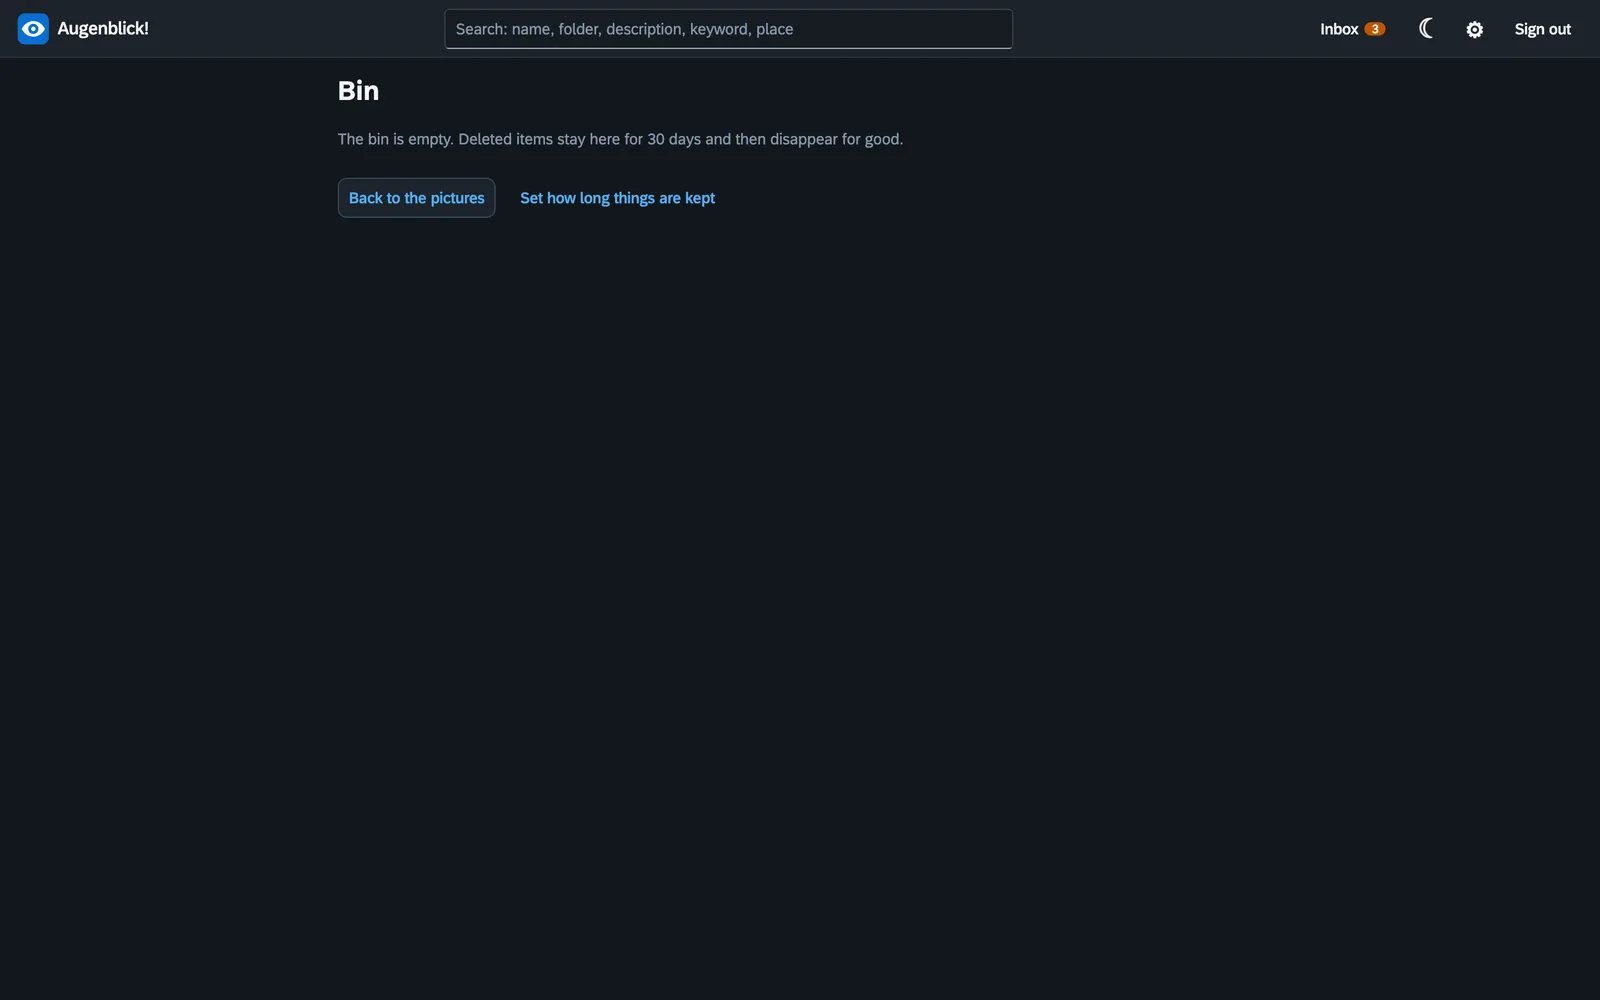
In Augenblick!, deleting always means: into the bin. The picture disappears from the timeline but stays on the disk, in a hidden folder of its area.
- Deleting one picture: “Delete” in the single view, or the Del key.
- Several: select them, then “Delete” in the bar.
- Bringing back: click Bin at the bottom of the sidebar, then “Restore”. The picture is back in its old place.
- Deleting permanently: one at a time or with “Empty bin”. This cannot be undone.
After 30 days, deleted items disappear by themselves. You set the period under cogwheel → Bin; 0 means that nothing ever disappears by itself.
Undoing changes
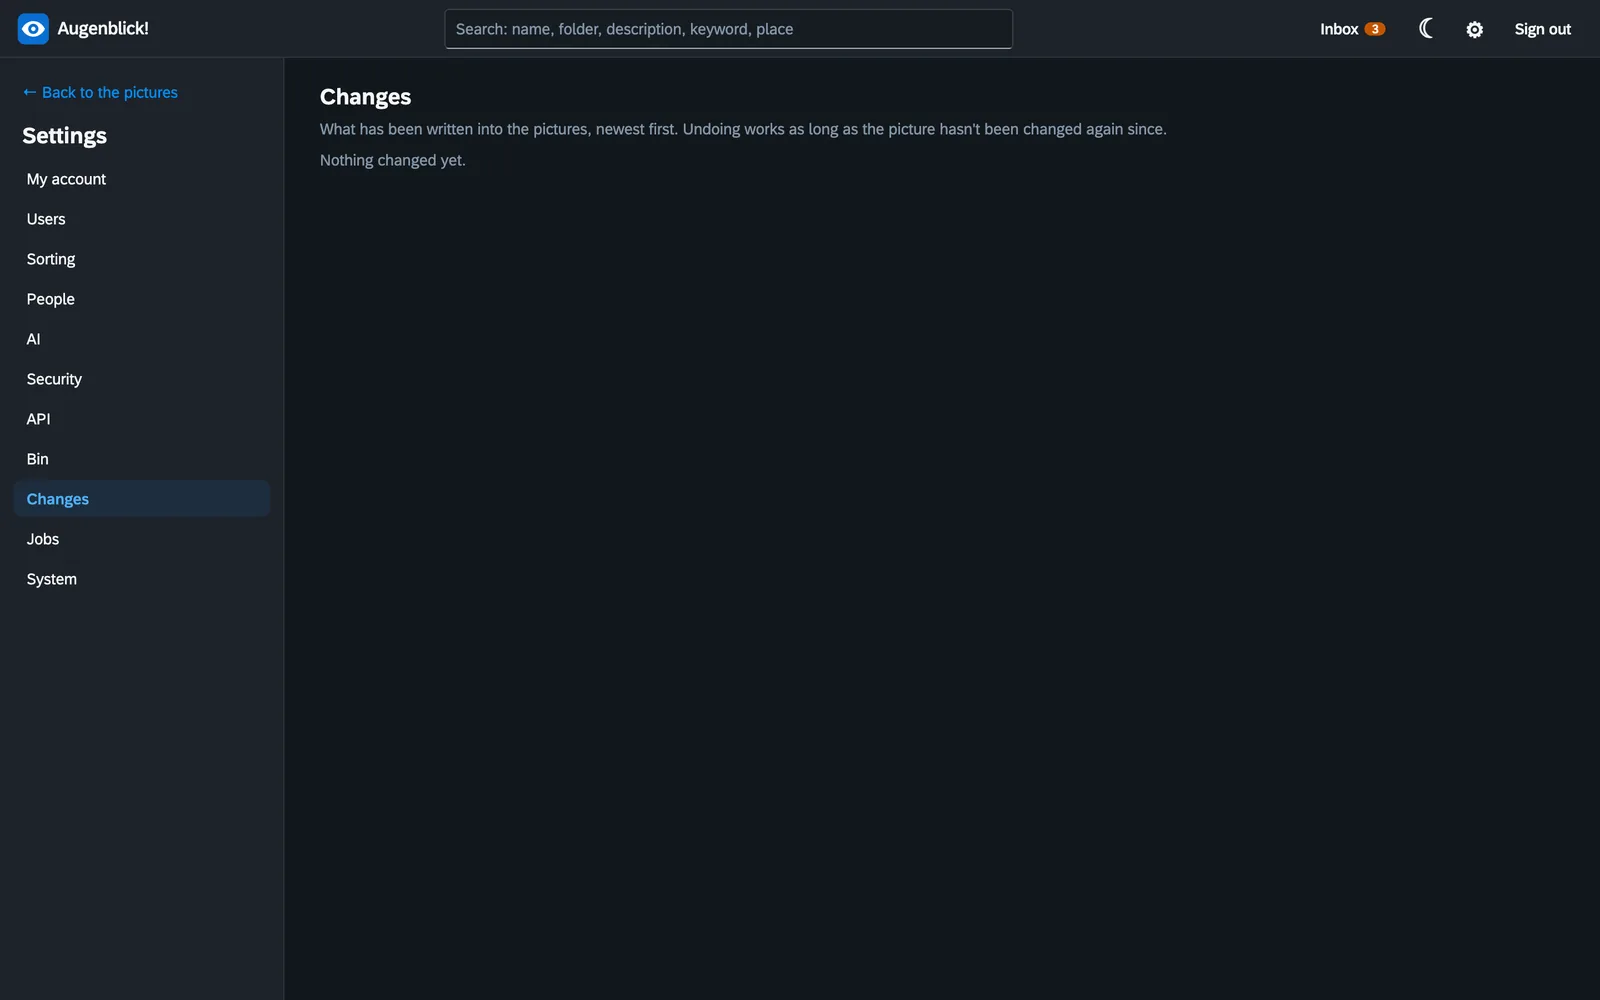
Augenblick! keeps a journal: a list of everything that has been written into the pictures, newest first – with date, user, old and new value.
- Cogwheel → Changes.
- Look for the entry.
- Click Undo.
Undoing restores the old details; a rotation or a move can be reversed this way too. If the same picture was changed again afterwards, you have to undo the later change first.
Uploading photos from the phone
Augenblick! does not fetch photos from the phone. Instead, a backup app on the phone sends new photos to Augenblick!. This has been tried and tested with PhotoSync; it works with any app that can do “WebDAV” (a widespread way of sending files to a server).
The photos land in an area of their own, the Inbox. From there you sort them in when you have time.
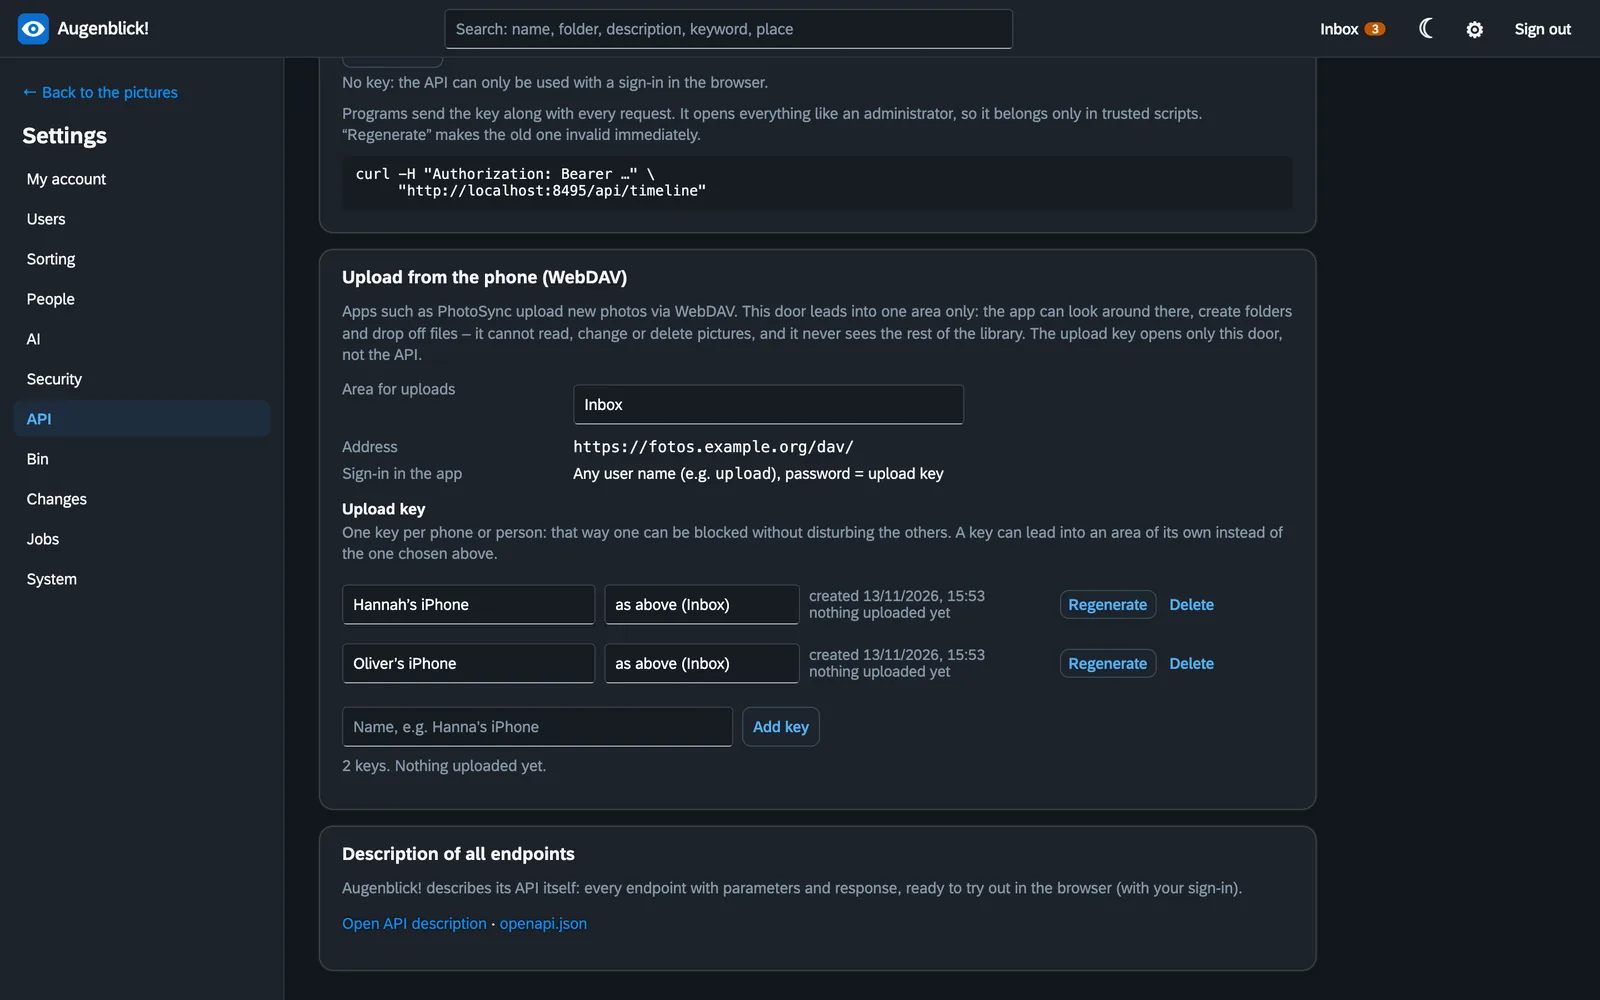
Setting up in Augenblick!
- Create an area called Inbox (see Areas).
- Cogwheel → API, section “Upload from the phone (WebDAV)”.
- At Area for uploads, choose the Inbox.
- Under Upload key, enter a name, such as “Hanna's iPhone”, and click Add key. A long key appears. Copy it at once: it is shown only this one time.
One key per phone
Create a key of its own for every phone or every person. For each key the list shows how many files came with it and when the last one arrived. If a phone is lost, you delete only its key (or regenerate it); the other devices notice nothing. A key can also lead into an area of its own instead of the general Inbox – that way every person gets their own inbox.
Setting up in the app on the phone
- In the app, create a new destination of the type WebDAV.
- Address: the address shown in Augenblick! under “Address”. It ends in
/dav/. Some apps – PhotoSync among them – ask for server and directory separately: then the name of the server goes into the “Server” field and/davinto the “Directory” field. - User: anything you like, for example
upload. - Password: the upload key.
- Set the app to transfer the originals unchanged, and switch off uploading in pieces (“chunks”) – Augenblick! only accepts whole files.
The Inbox
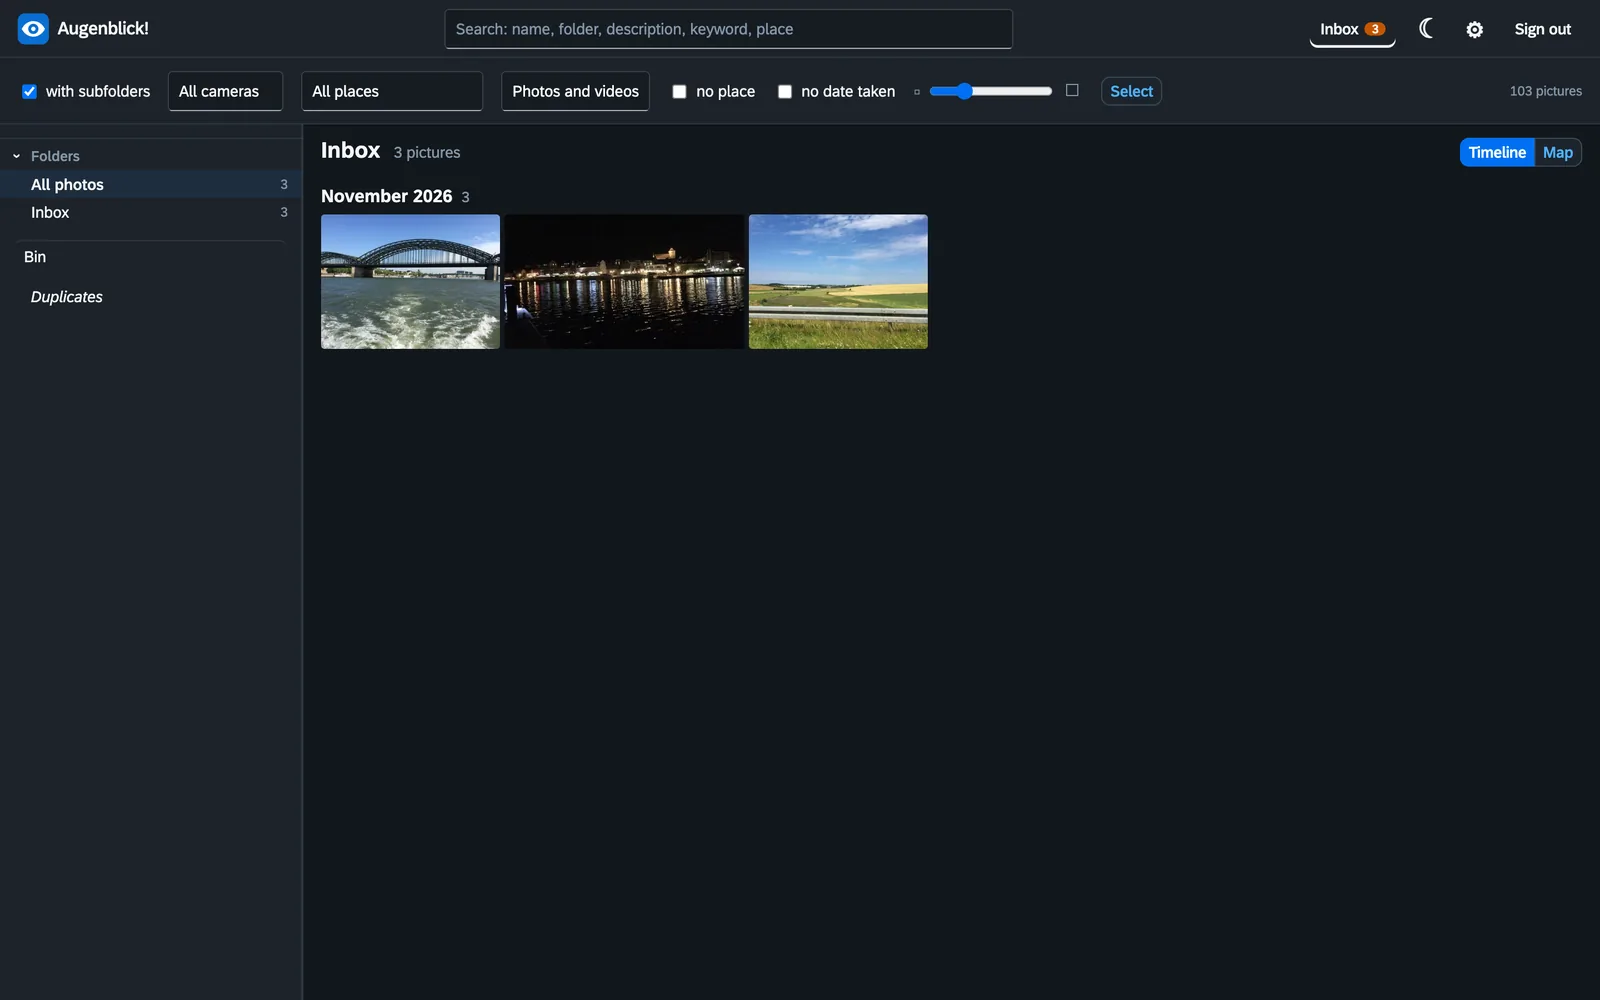
As soon as an upload has been set up, the Inbox button is at the top, with the number of pictures waiting there. What is in the Inbox does not appear in the timeline, nor in the albums, categories and people of the rest of your library – it is only meant to belong once you have sorted it in.
In the Inbox itself everything works as usual: viewing, labelling, rotating, naming faces, deleting. Select the pictures that are to stay and use Move to …, for example to “Family”. If there is a sorting rule there, they land straight in the right folder for the year. A click on the logo at the top left leads back to the timeline.
Why this is safe
- The upload key opens only this one door. Nobody gets into the photos, the settings or the rest of the interface with it.
- Through the door one can only look at what is in the Inbox, create folders and drop off files. Reading, changing and deleting are not possible.
- Nothing is overwritten: if the same file arrives again, nothing happens; a different picture of the same name gets a number.
- Only photos and videos are accepted.
- If a phone is lost, you delete its key; it stops working immediately.
Note: The upload only works when the phone can reach Augenblick! – that is, at home on the Wi-Fi, or on the move if you have made your home network reachable from outside (via a VPN, for example).
AI suggestions (optional)
Augenblick! can ask an AI for suggestions for description and keywords, and have it estimate the year of old pictures without a date. This is switched off until an administrator sets it up under cogwheel → AI.
- Possible providers are Claude (Anthropic), an Ollama machine of your own at home, or another compatible service.
- In the single view the Ask AI button asks for this one picture. The answer fills in the details form in advance.
- The AI never writes by itself. Only your click on “Write into the picture” saves.
- Individual areas can be excluded; their pictures never go to the AI.
- A monthly limit caps the costs.
- The AI answers in the language you have chosen for your account.
- Two further aids are switches and buttons of their own: giving a memory a title and weeding out false hits among the faces.
Note: With a provider on the internet, the picture you ask about leaves your home – reduced in size, and only that one. With an Ollama machine of your own everything stays with you.
Users and security
Creating users
- Cogwheel → Users → New user.
- Enter a user name (in lower case, without spaces), a display name and a password of at least 12 characters.
- Choose for each area: no access, read or read + write.
- Save.
Someone who may only read an area can view and search there, but cannot change, move or delete anything. An administrator sees all areas and may change the settings.
My account
Under cogwheel → My account you choose your language, change your password, see which devices you are signed in on, and sign out individual devices or all the others.
Second factor
With the second factor the password alone is not enough: Augenblick! additionally asks for a six-digit code from an authenticator app on your phone. Set it up under “My account”. Keep the recovery codes somewhere safe; they get you in when the phone is gone.
From outside
Under cogwheel → Security an administrator decides that sign-ins from outside the home network only work with a second factor, and can be notified of a sign-in from outside or a locked account. After several wrong passwords an account is locked for a while.
Backup
Augenblick! is no substitute for a backup. Back up regularly:
- The photo folder. That is the most important thing. Because all details are in the pictures, backing up the photos also backs up date, place, description, keywords, albums and names.
- The data folder. It contains the user accounts, the settings and the journal.
If only the data folder is lost, that is annoying but no disaster: Augenblick! scans the photos again and finds all the details once more. What would be lost are the accounts and the possibility of undoing old changes. Decisions such as “ignore this face” are additionally kept by Augenblick! as a readable file alongside the photos (in the hidden folder .augenblick of each area) and are brought back from there.
Augenblick! on the phone
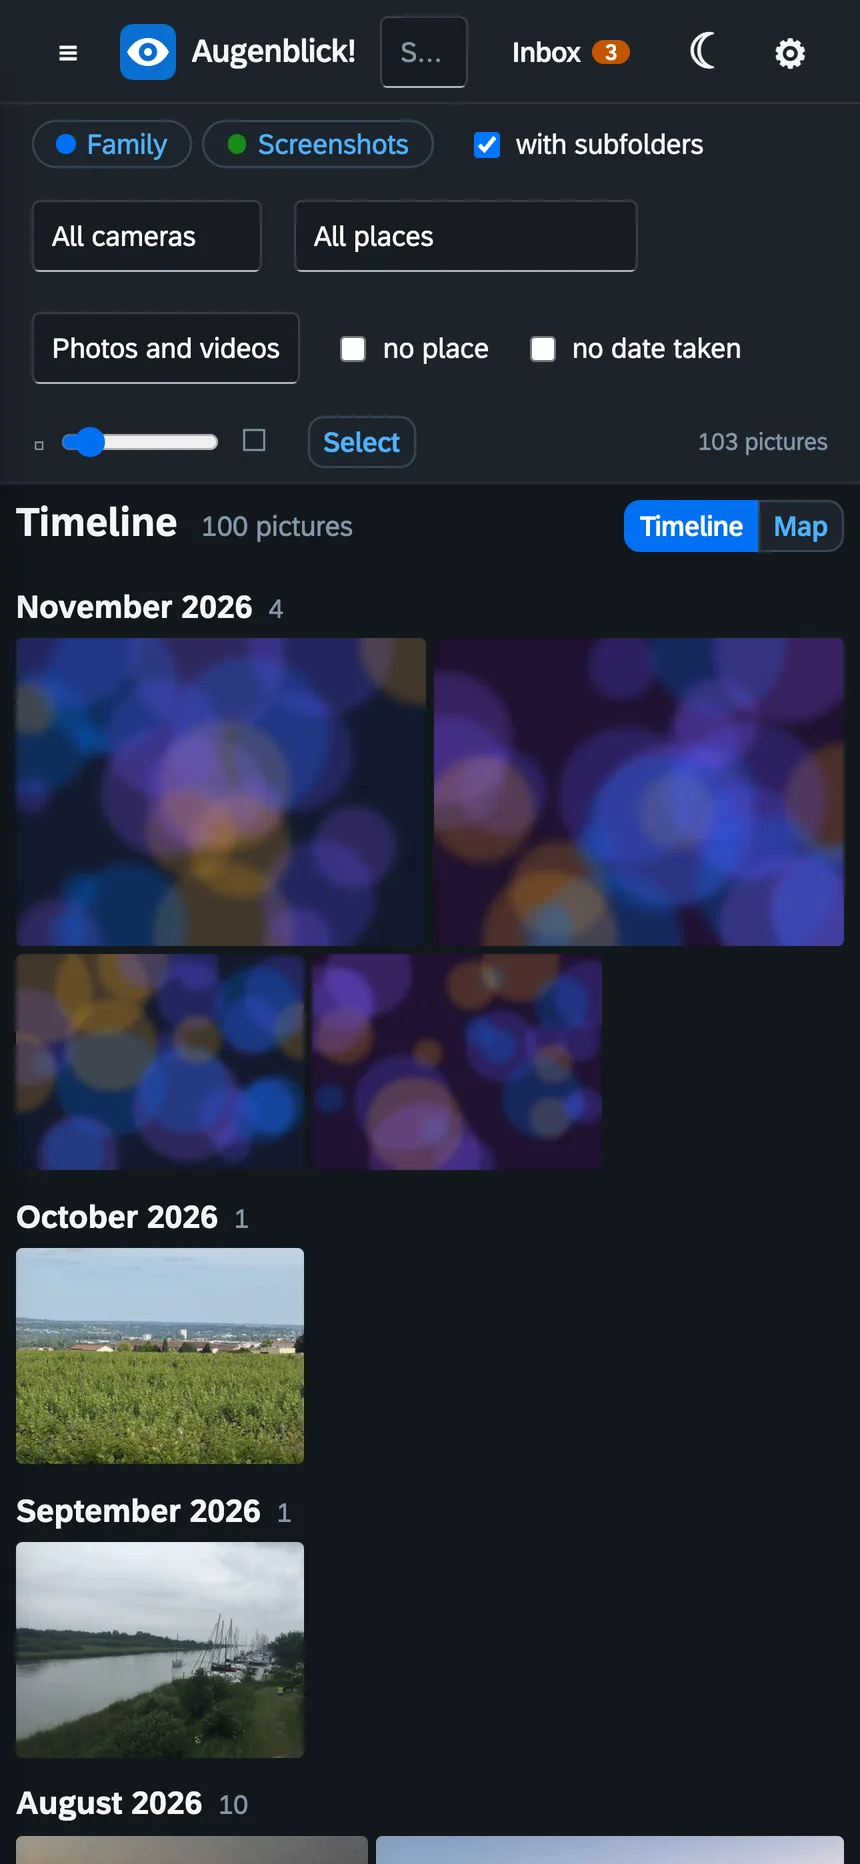
On the phone, open the same address in the browser as on the computer and sign in. The interface adapts: the sidebar with albums and folders folds out with the ☰ button at the top left, and the pictures are below it.
To have Augenblick! sit on the home screen like an app: in the browser “Share” → “Add to Home Screen” (iPhone), or the menu → “Add to Home screen” (Android).
There is no right mouse button on the phone. What the menus offer, you reach there with the buttons: “Select” and the bar at the bottom, “Details” in the single view.
When something does not work
- I see no pictures, or too few. Are all area switches at the top switched on? Is there still something in the search field? Is a filter set (“no place”, a camera, a place)? Is a folder, an album or a person chosen on the left? “All photos” in the folder tree shows everything again.
- New pictures are missing. Augenblick! checks every 15 minutes. For an immediate check, go to cogwheel → System → “Rescan folders now”.
- “Details” is missing or greyed out. Either Augenblick! has been set up purely as a viewer (see Installation), or you only have read permission in this area.
- A picture cannot be changed. In rare cases the details in a file are so damaged that the writing tool refuses. The picture then stays unchanged; the message gives the reason.
- The date of a picture is wrong. Open the picture's details and enter the date. If it is about many pictures with the same mistake (camera clock wrong), select them → “Change …” → date “shift by”.
- A picture still shows up in the album although I have moved it. That is as it should be: an album is a mark in the picture and does not depend on the folder. If it is to leave the album, remove the album from the picture.
- The upload from the phone does not work. Is the phone in the same network? Does the address end in
/dav/(with separate fields: is/davin the directory)? Has the upload key been entered as the password, and has an area been chosen? Is uploading in pieces switched off? Under cogwheel → API you can see for each key when something last arrived. - Uploaded pictures are missing from the timeline. They are in the Inbox – the button at the top. They get into the timeline when you move them to another area.
- The interface is in the wrong language. Cogwheel → My account → Language.
- Journeys are missing from the memories. A journey needs at least two days and ten pictures that know their place, and it has to be some way from home. You can add the place to pictures that lack one: select them → “Change …” → set the place.
- The page could not be reached for a moment. After an update Augenblick! restarts; that takes about half a minute. Then reload the page.
- I have done something wrong. Cogwheel → Changes → “Undo”, or fetch the picture back from the bin.
Small glossary
- Administrator: a user who may see everything and change the settings.
- Album: a collection of pictures on one subject. A mark in the picture, not a folder.
- Area: a top-level folder with rights of its own: Family, Inbox, Screenshots.
- Browser: the programme you use to look at web pages: Safari, Chrome, Firefox, Edge.
- Category: a collection that fills itself: videos, favourites, panoramas.
- Container, Docker: Docker starts programmes that are delivered ready-packed. The packaging together with its content is called a container.
- Coordinates: two numbers (latitude and longitude) that mark a point on the earth.
- HEIC: the space-saving photo format of newer iPhones.
- Inbox: the area in which new pictures from the phone wait until you sort them in.
- Index: the table of contents that Augenblick! builds while scanning so that searching is fast. It can be rebuilt from the photos at any time.
- Journal: the list of all changes, with the old and the new value, for undoing.
- Keyword: a single word attached to a picture that you can search for.
- Live Photo: an iPhone photo with a short film to go with it.
- Memory: a journey or a look back, found by Augenblick! from date and place.
- Metadata: details about a picture that are in the image file: date, place, camera, description, keywords.
- NAS: a small computer with hard disks that is connected to the network at home and always running.
- Raw file (RAW, DNG): the unprocessed picture as the sensor delivered it. Large, but with all the reserves for later editing.
- Scanning: Augenblick! checks which pictures exist and notes their details. Nothing is changed in the process.
- Second factor: an additional code from an app on the phone that is asked for alongside the password.
- Upload key: a long password with which the app on the phone may deliver photos – and nothing else.
- WebDAV: a widespread way of sending files to a server over the network. Many backup apps can do it.